> 💡 NOTE: X-Plane’s Taxi-Sign Specification was originally a joint effort between FlightGear and X-Plane and applicable to both simulators; however, X-Plane has evolved in a differing direction and this specification may no longer be applicable to Flight Gear.
General
- 3D Taxi-Signs in X-Plane are auto-generated, and the glyphs (letters and symbols) on each Taxi-Sign are rendered from a text string of ASCII characters called a taxi sign string or sign string. S_ign strings_ for each Taxi-sign are part of the apt.dat file.
- Sign strings are case sensitive! When we write “A-Z”, we mean upper case letters. When we write “a-z”, we mean lower case letters.
- Sign strings may contain NO new line characters and NO whitespace characters (tab, spaces)
- Example Taxi Sign String:
{@L}P2{@R}16-34CAT{r1}{@Y}{@@}{^lu}P2{@L}P2
Glyphs
A glyph is simply a graphic shape that means something. The letters of an alphabet are glyphs. Symbols are glyphs. Egyptian hieroglyphics are glyphs, etc. We use the term glyphs here because a Taxi-Sign contains more than just letters in an alphabet. The image below shows all the possible Taxi-sign glyphs that are available in X-Plane.
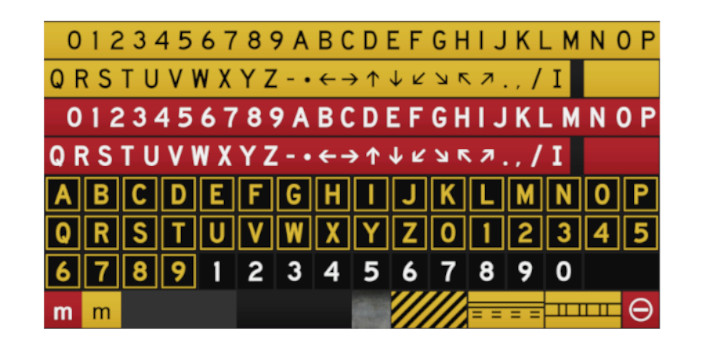
A Taxi-Sign glyph is represented / encoded by either a single ASCII character (single-char-glyph) or a ASCII character sequence (multi-char-glyph). We call these encodings glyph-strings; therefore, a Taxi-sign’s contents are rendered from a taxi sign string, which further consists of individual glyph-strings.
Curly Bracket Pairs
Curly brackets are used to bracket either Control Directives, or multi-char-glyphs. The following rules apply to the use of curly braces
- Every open curly brace must have a closing curly brace.
- Curly brace pairs must not be empty.
- Nested curly braces are not supported.
Control Directives:
Control directives are two-character sequences in brackets that tell X-Plane which color category of Glyph to use, as well as delimit what is on the front and back of the sign. Control directives for the color category are modal, meaning all glyphs after that directive will use that color until another color directive is specified. There are five directives available as follows:
| Directive | Description | Glyphs Supported |
|---|---|---|
@Y |
Use Yellow background set | Supports all valid glyphs |
@R |
Use Red background set | Supports all valid glyphs |
@L |
Use Black background with yellow chars | Supports only A-Z, 0-9 |
@B |
Use Black background with white numbers | Supports only 0-9 |
@@ |
following glyph strings for back of sign |
Single Char Glyphs
Single char glyphs are represented by a single ASCII character, for example A, –, 6, etc. The following are valid single letter glyphs:
| Character | Description |
|---|---|
A-Z |
Capital Letters A thru Z |
0-9 |
Integers 0 thru 9 |
- |
produces a hyphen |
* |
produces a dot |
. |
produces a period |
, |
produces a comma (when used outside brackets |
/ |
produces a slash separator |
_ |
produces a space |
Multi Char Glyphs
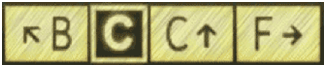
Multi char glyphs are glyphs that are encoded using more than one ASCII character. Multi char glyphs must be contained inside curly brackets unless the Taxi Sign String qualifies for Comma Delimited Syntax. The image below highlights the glyphs that use multi char glyph strings.

The following table lists the multi-char glyph strings:
| Glyph String | Description |
|---|---|
^u |
Up Arrow |
^d |
Down Arrow |
^l |
Left Arrow |
^r |
Right Arrow |
^lu |
Left Up Arrow |
^ru |
Right Up Arrow |
^ld |
Left Down Arrow |
^rd |
Right Down Arrow |
r1 |
Roman Numeral I |
r2 |
Roman Numeral II |
r3 |
Roman Numeral III |
no-entry |
“Do not enter” symbol |
critical |
ILS Critical Area Boundary sign |
safety |
Runway Safety Area |
hazard |
Taxiway Ending Marker |
comma |
For an actual comma on the sign |
> 💡 NOTE: The character, ^ is only valid when used with the multi-char glyph strings above.
Fixed Glyphs
Fixed Glyphs are those glyphs that always appear the same, regardless of the active color directive. The following are the fixed color glyphs: hazard, safety, critical, no-entry

Divider Line
The Divider Line is a special glyph, encoded by the pipe symbol, ‘|’, and having some special rules for its use. Below is an example of two signs, one with and one without the Divider line. The Taxi Sign String used to produce each sign contents is also given.
{@Y}BOOK|CASE {@Y}BOOKCASE

The following conditions apply to use the Divider Line / pipe symbol
- A Divider Line must have the same color glyphs on either side of it.
- e.g.
{@Y}BOOK|{@R}CASEis illegal.
- e.g.
- The Divider Line only works for @Y, @R, and @L color modes. Any pipe symbol following a @B directive is ignored.
- A divider line cannot be:
- next to a Fixed Glyph
- next to another Separator Line
- at the beginning or end of a sign side.
Comma Delimited Syntax
When a Taxi Sign String only contains a single directive, then the Taxi Sign String may be fully contained within a single set of curly brackets along with the one Control Directive; however, each glyph string after the directive must be comma delimited. This reduces the amount of curly brackets required for single sided signs with only one color mode, e.g.
{@Y,^lu,TERMINAL,|,CARGO,^ru}

Unsupported Characters
!“#$%&‘()[]+:;<=>?~bgjkqvwx
Example Taxi Sign Strings

{@L}A

{@Y}{^l}C

{@Y}17-35{^r} or {@Y,17-35, ^r}

{@B}1 or {@B,1}

{@R}11-29 or {@R,11-29}

{@L}B7{@R}10CAT{r2}/{r3}
{@Y}{^lu}B{@L}C{@Y}C{^u}|F{^r}

{@Y}WEST_APRON{^r} or {@Y,WEST_APRON,^r}

{@L}P2{@R}16-34CAT{r1}{@Y}``{@@}{^lu}P2{@L}P2 (Front Side – blue text)

{@L}P2{@R}16-34CAT{r1}{@Y}{@@}``{^lu}P2{@L}P2 (Rear Side – blue text)
> 💡 The following table is a table of Control Directives that are only used for error reporting and internal usage. They cannot be used by hand.
| @I | Glyph specific | These are the Fixed Glyph Signs: critical, no-entry, safety, and hazard and cannot be declared by hand |
|---|---|---|
| @P | Represents a pipebar, only for error reporting | Indicates the glyph is a pipe bar and should be checked if valid |
| @X | Only for error reporting | Indicates that parsing stopped before any valid color has been found |