Decals are overlay textures that sit on top of a regular albedo (day-time) texture to add high-frequency, high-res detail to an existing texture.
A typical use of decals might be:
- To add a grassy leafy pattern to a field or airport grass texture.
- To add a gravel pattern to a runway or road.
Decals work by modulating the textures they overlay. Decals typically repeat much faster than the base texture, but may also be used at a very low frequency to add subtle changes in the overall brightness of the terrain across a very large area, helping to disguise repetition.
Decals contain high frequency pixels at high res; when viewed from far away, the entire decal blends together into a constant color/grayscale. The decal shader ensures that when a decal has become a solid tone (because it is far away) the net result is the same as your underlying albedo. In other words, as you move away from the decal, the decal blurs into “no effect”. This means that you can generally apply decals and not worry about the effect on the far-away view.
Decal Texture Formats
A texture typically has two decals together:
- One RGB decal in the color components of the texture.
- One alpha decal in the alpha channel.
If you do not need the RGB decal, you can save VRAM by having a decal with only alpha (this is done using a gray-scale no alpha png on disk). If you need the RGB decal but not the alpha decal, there is no VRAM savings (the alpha channel is included in VRAM no matter what) so you might as well use the alpha channel for something.
Decal Application
Decals are applied by specifying a DECAL command in the text file for the art asset. (Decals are allowed in any file that uses the Standard Shader, including .ter, .pol, and .net files.) The DECAL command specifies the texture to use and the mixing parameters that control application.
Examples
The following examples are based on some of Albert’s and Sergio’s terrain textures, and attempt to show some of the possible ways decals might be applied. They are not intended to be perfect, and make use of decal textures that Alex happened to have lying around! The examples also include some suggestions for normal map usage. For the purpose of these examples, the terrain files were applied to flat, horizontal mesh – mainly for convenience!
Example 1
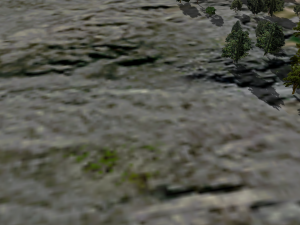
The first example is based on Albert’s rock_cld_hill_d.png albedo (as far as we’re concerned, “albedo” is just another name for “daylight texture”).
Here is a small section of it, in it’s basic form:
This is the basic terrain file:
A
800
TERRAIN

BASE_TEX   ..textures/dev/rock_cld_hill_d.png
BORDER_TEX  ..textures/border/apt.png

PROJECTED  1500  1500
NO_ALPHA
COMPOSITE_BORDERS
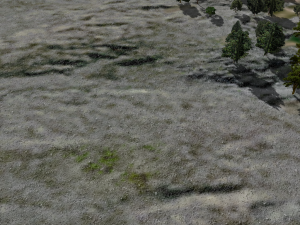
First, we will use the DECAL command to apply a grayscale detail texture. DECAL is the simplest form of X-Plane decal, and has the following characteristics:
- It can only every apply a greyscale decal texture. X-Plane greyscale decals are applied using a blending mode similar to Photoshop’s “hard light” mode.
- The decal is applied evenly across the entire area of the albedo.
DECAL has just two parameters: a scale ratio, and the texture file name.
DECAL 25.0 ..textures/soil/DECAL_stony_dirt.png
Adding this line to the file means that we will apply DECAL_stony_dirt.png at 25.0 x the frequency of the albedo, in other words, it will repeat every 60 metres. (Note: the decal texture does NOT need to have the prefix DECAL – I just happen to use that convention).
This is the result:
In some cases, a simple, homogenous greyscale decal like this will be enough. In our example, however, the albedo contains patches of vegetation. It would be nice to apply a different decal to the vegetation, instead of DECAL_stony_dirt.png. To do this we can use either DECAL_KEYED or DECAL_PARAMS, the other two types of X-Plane decal. There are two ideas we need to understand first:
- Although we will be using two separate decal images, they will both be squeezed into a single texture file! By using a combination of one RGB decal and one greyscale decal, we can save VRAM by putting them both into a single RGBA file. The greyscale image goes into the alpha channel. This means, of course, that only one of our two decals will be in colour, but in practice, there are many cases where greyscale can be very effective. Both DECAL_KEYED and DECAL_PARAMS reference only a single texture file, therefore, even though they let us use two decal images. There is a restriction, however: both images are applied at the same scale. In other words, they will both cover exactly the same area of terrain.
- We control exactly which decal gets applied to which areas of the albedo by using a key. A key is a variable which tells the shader how strongly to apply a decal to a given pixel of the albedo texture. DECAL_KEYED uses a single key to control both the RGB and the greyscale decals, while DECAL_PARAMS uses two keys, one for each decal. Each key has four controls: R, G, B, and A. By tuning these controls, we can apply a decal more aggressively to some pixels than others.
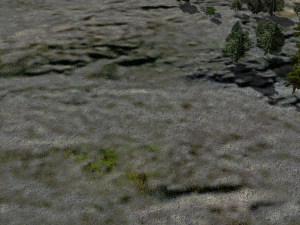
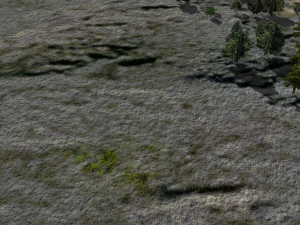
Let’s continue with our example by removing the simple greyscale DECAL, and replacing it with a DECAL_PARAMS. We will be using an RGBA decal texture which contains an RGB “vegetation” decal, and a greyscale “stony_dirt” decal – in fact, the greyscale decal is exactly the same image as the one we used before, the only difference is that this time it lives in the alpha channel of an RGBA texture instead of being a discrete file of its own:
A
800
TERRAIN

BASE_TEX   ..textures/dev/rock_cld_hill_d.png
BORDER_TEX  ..textures/border/apt.png
PROJECTED  1500  1500
NO_ALPHA
COMPOSITE_BORDERS

DECAL_PARAMS  25.0  0.5       -3.5  0.0  -3.5  3.0      2.0  -2.5  2.0  0.0    ../textures/loveg/RGBA_DECAL_shrub_dirt_sdry3.png
What are all these parameters?
- The first parameter is the scale ratio, relative to the albedo (BASE_TEX), exactly the same as it is in the DECAL command.
- The second parameter is the “dither ratio”. It controls the relative influence of the albedo and the decal on composite border dithering.
- The next four parameters are the controls for the RGB decal’s key.
- The next four parameters are the controls for the greyscale decal’s key.
- The last parameter is, of course, the decal texture file name.
How do the parameters get these values?
We set the scale ratio as before, at 25:1, so that the decals both repeat every 60 metres.
We set the dither ratio to 0.5. This means that the albedo and the decals will have roughly the same influence on the shape of the rendered borders. Higher values favour the decal. This means that if, like in this example, the decal is of higher frequency that the albedo, increasing the value of this parameter will make borders more “finely-grained”.
This is where it gets a bit more complicated!
Looking at the albedo texture, we observe that the rocky parts are mainly grey and relatively light in colour (ignoring baked shadows for now). On the other hand, the vegetation is mainly green and rather darker than the rock. (This statement is clearly an approximation, but is accurate enough for our purposes.)
Therefore, by tuning the RGB decal’s key to respond to darker, predominantly green colours, the areas of vegetation will receive more of our RGB decal, which is conveniently a sort of “shrubby” image.
In a similar fashion, by tuning the greyscale decal’s key to brighter, grey tones in the albedo. those areas will receive more of the greyscale decal – our “stony dirt” image from before.
The actual values for the two keys are usually found by experiment, and do not follow any particular rules or equations. Experimentation is probably the best way of getting a feel for the controls, but this is how I arrived at the values in our example:
The second key (the one controlling the greyscale decal) is a bit more obvious that the first one, so we’ll start with that. We want the rocky decal to be applied only to bright areas, so we set high values for R (=2.0), and B (=2.0). However, we don’t want it to respond to green (we don’t want rocks on our vegetation) so we set a low value for G (=-2.5). As mentioned at the top of this page, the exact function of control A depends on what other shader tricks we’re using in the .ter file. In this case, it is simply a constant value which gets added to the R, G and B values. Basically, the greater the value of A, the more of that decal we will get. So in the case of our greyscale decal key, we set A to zero, because we only want to see the decal on bright colours. If we were to set a higher value for A, we would see the decal regardless of the colour of the albedo!
Now let’s look at the first key, the one which controls our RGB “shrub” decal. In contrast to the greyscale decal, we want to see the RGB decal on both light and dark parts of the albedo – provided they are greenish. Therefore, we start by setting a high value for A. Doing this will draw shrubs over everything, so we must now tune out those areas we want to be shrub-free, by reducing the values of both R and B to -3.5.
The reason why some of these values are greater than 1.0 is that in order to get a reasonably sharp transition between regions of vegetation and regions of rock, we have to exaggerate the effect of the tuning controls. The actual difference in tone between a “veg” pixel and a “rock” pixel is generally pretty small, so we need to crank up the controls in order to get some “grip” on the albedo. The final key values are clamped between 0.0 and 1.0, so “overdriving” the key values will not cause artefacts in actual visible textures.
Here is the result:
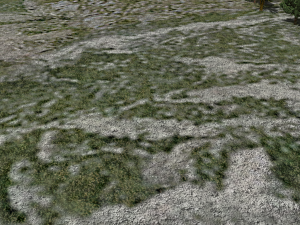
Here is the same decal applied to a different albedo (sparse_cld_steep_D.png) with exactly the same parameter values:
To return to our first example, let’s now try adding a normal map. First, we’ll use a normal map that was originally designed to suggest rough, open grassland. It was made by hand-painting a greyscale height-map in Photoshop, using a soft-edged pen to create hummocks and clumps of grass, and basic noise to add “grit”. This was then baked into a normal map in Blender. Although it is doesn’t match the albedo, it still adds a nice sense of richness and depth to the terrain, and by adjusting the scale, quite a satisfying effect can be achieved:
Our .ter file now looks like this:
A
800
TERRAIN

BASE_TEX ..textures/dev/rock_cld_hill_d.png
BORDER_TEX ..textures/border/apt.png
PROJECTED 1500 1500

NO_ALPHA
COMPOSITE_BORDERS

DECAL_PARAMS 25.0 0.5 -3.5 0.0 -3.5 3.0 2.0 -2.5 2.0 0.0 ../textures/loveg/RGBA_DECAL_shrub_dirt_sdry3.png

NORMAL_TEX 6.0 ../textures/loveg/clumpy_turf5_NML.png
Changing the scale of the normal map (from 6.0 to 11.0) creates a slightly different effect:

General Observations Regarding Decals and Normal Maps in the context of terrain
The following points are based on the results of tests so far conducted by the author (Alex) and on some more general resource-management considerations.
Effective scaling
It seems that best results are obtained when the scale ratios between individual elements within a terrain definition is not “too large”. If the scale ratio between one element and the next-closest-in-scale exceeds a value in the region of 100 – 150, it is difficult to make them look integrated. Instead, they are likely to look like independent, unconnected layers, which is generally not desirable. An effective strategy for combining multiple elements in cases where the scale ratio between the largest and smallest is great seems to be one of adding an additional element of intermediate scale. For example, if a 10 x 10 m decal is applied directly to a 4000 x 4000 m albedo, the effect will probably not be good, since the scale ratio is very large: 400.0. However, adding a normal map of an intermediate size, say, 100 x 100 m, will help to bind the decal to the albedo, because the largest relative ratio between _successive_ elements is now 40.0:
Element       Size (m)      Scale Ratio     Relative Ratio
Albedo       4000 x 4000         -
Normal map    100 x 100         40.0             40.0
Decal          10 x 10         400.0             10.0
It is this relative ratio which appears to be critical to the effectiveness of the terrain. The exact order or type of the elements seems less critical. For example, an alternative strategy in the above case might be to use a 100 x 100 m decal and a 10 x 10 m normal map.
Realism versus Impressionism
In my earlier experiments, I took a literal, realistic approach to design, choice, and scaling of decals – I attempted to match their size and content as closely as possible to the real world. However, results seem to suggest that, in many cases, a looser, more impressionistic approach can be as – or more – effective.
For example, it is possible to use a “park grass” decal to suggest much rougher terrain simply by reducing its scale ratio (thus increasing the area it covers). Similarly, a normal map designed to suggest a field of boulders might be used at a smaller size to represent fine scree.
Arguably, a truly accurate effect is beyond the scope of our system, and would require a disproportionate allocation of resources to make it work. However, I’m of the opinion that by adopting a more impressionistic approach, really good results can nevertheless be achieved, without obvious compromise of realism. In the previous section’s Example 1, a greyscale decal representing loose, stony ground is applied to a sheer rock albedo. Even though it is not strictly speaking realistic, it nonetheless adds interest and richness to the terrain. That particular example is probably taking this principle a bit too far – a more appropriate decal would make for a more realistic effect – but in terms of our visual priorities, it is suggested as a potentially acceptable method by which to add detail to our terrain reasonably quickly.