Introduction to the Parts of the Particle System
The X-Plane 11 particle system follows a fairly standard game-industry design:
- A particle system consists of a collection of emitters and particles. There can be many particle systems running in X-Plane at the same time, and they do not interact with each other.
- A particle system’s behavior is controlled by a particle system definition text file. More than one particle system can use the same definition file at a time.
Particle Types
Every particle in a particle system has a type, and the definition file defines the behavior of every particle type. Typically you will have a small number of types per definition file. For example, a definition file that contains “smoke and fire effects” might contain three types of particles: a flame particle, a white smoke particle, and a black smoke particle.
The particle type definition controls the appearance and behavior of the particle over time, including what textures it uses and how it grows/shrinks and fades over time.
Every particle that is created in a particle system has a finite lifetime (measured in seconds) before it disappears. The particle definition file defines how the particle type is drawn over that lifetime. For example, a typical behavior is to make the opacity of the particle fade from 100% to 0% over the lifetime of the particle, so that the particle slowly disappears.
All properties of the particle type that can be key-framed are key-framed over either the lifetime of that particle, or by data-refs. You can use more than one key-frame table; the results of each table are multiplied to get the final result.
Emitter Types
An emitter creates particles; every emitter has a type, and the emitter type definition defines how the emitter creates particles.
The emitter always creates the same type of particles, but it can control the particle’s initial properties, including its initial size, its initial opacity, and how long it lives for.
Emitters are used in the simulator by attaching them to objects or aircraft. The emitter would be attached at a particular location on an OBJect with a particular direction; if the object is on an airplane, the emitter moves with the airplane. For example, you might put an emitter of smoke puffs on the exhaust pipe of an aircraft.
For convenience, X-Plane lets you put one or more sub-emitter into each emitter. Each sub-emitter can emit its own type of particles with its own properties. The motivation here is to make it easy to attach a lot of emitters to a single point in an object.
For example, our gun-barrel emitter contains two sub-emitters: one for the muzzle flash (emitting a small number of fire particles) and one for the smoke (emitting a larger number of smoke particles). By wrapping both sub-emitters in a single emitter, it’s simple to attach the one “gun barrel” emitter to the tip of a gun barrel on a fighter.
The various properties of the emitter (number of particles created per second, initial velocity, etc.) are key-framed based on datarefs. So you can specify that an emitter makes more particles (or faster particles, or bigger particles) as the engine’s N1 spools up. In this way, an emitter can dynamically change its stream of created particles based on inputs from X-Plane.
Datarefs attached to emitters can use wild-cards for array indices. When you specify [*] for a dataref index (e.g. sim/flightmodel2/engines/N1_percent[*]) the * is replaced with an index number that comes from the OBJ file where the emitter is attached. This lets you use a single ‘generic’ emitter for all engines in your aircraft and specify the engine index number each time you use the emitter. (This mechanism works the same as wild card parameters in FMOD.)
Many parameters of the emitter type definition can be randomized. In this case the parameter ha a lower and upper bound that can be edited separately. Since the parameter is key-framed, the amount of randomization (the distance between the two parameters) can vary based on a dataref.
Effect Types
Emitters are attached to parts of the X-Plane world (scenery objects, airplane objects, etc) and run continuously based on their volume. This is good for continuous sources of particles like a smoke stack, but it is not good for a finite event, like an explosion.
An effect is a collected sequence of key-framed emitter locations and values. An effect is something that happens over a time and start location. For example, an explosion effect might contain instructions to run a fire emitter for 10 seconds.
The properties of an effect are key-framed to the time of the effect; the effect has a finite total duration. Thus for an effect you can create a smoke emitter that creates a lot of smoke and then have the smoke level slowly die down.
Effects cannot be attached to objects; rather X-Plane uses effects directly at specific times, e.g. when a bomb hits the ground or when the airplane crashes.
Accessing the Particle System in X-Plane
As of X-Plane 11.30d2, the X-Plane B737 has been updated to use the particle system and can be used as a reference.
Pick “Show Particle System Browser” from the developer menu to access the in-sim particle system UI. You will see a list of all currently loaded particle system definition files (.pss files). You can edit any loaded particle system shown in the browser by double-clicking to open its editor. Note that these windows can be resized or popped out, and the width of the columns in the .pss window can be adjusted.
To create a new particle system, click the “New…” button and pick a particle system file on disk. The location of your particle system on disk matters because only textures in the same folder as the particle system (or in sub-folders) can be used.
To open and edit a particle system not currently in use by X-Plane, click the Open… button and browse to your .pss file.
The particle system editor
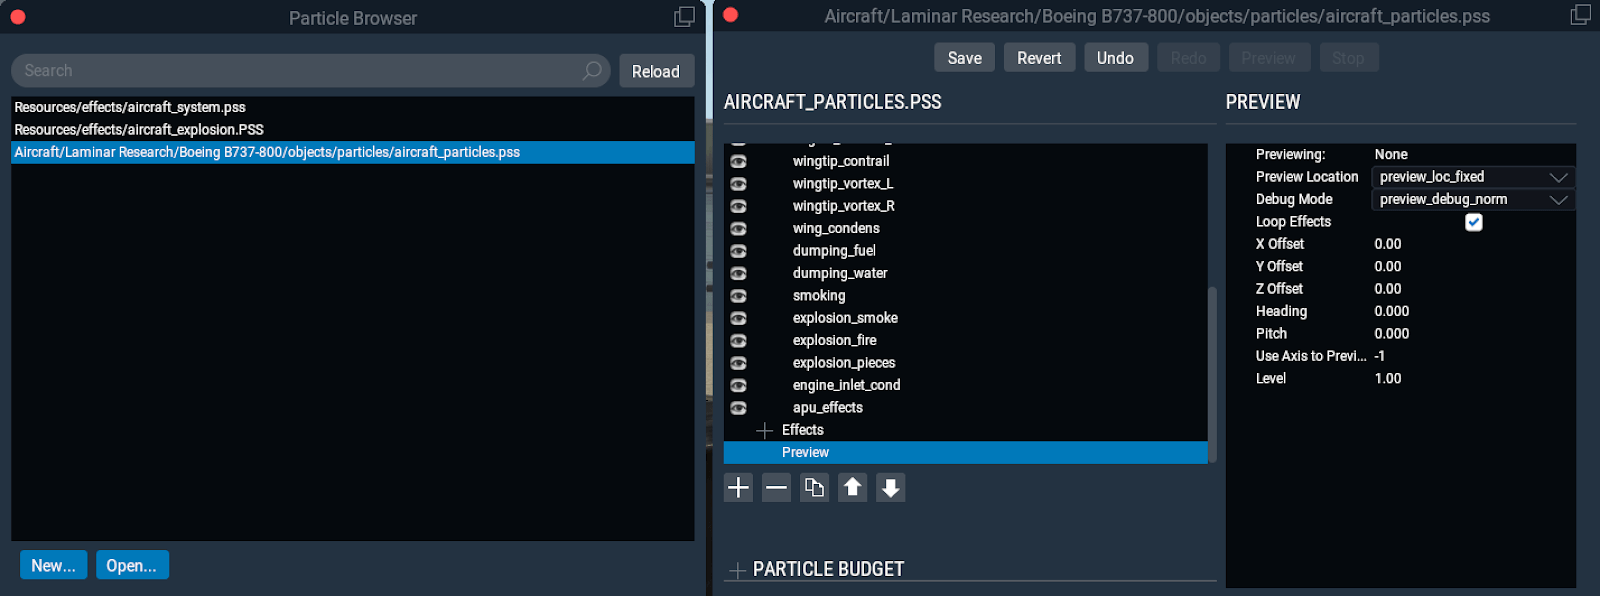
The upper left column (named for whichever particle you double clicked to open from the browser) is a hierarchy list of all particles, emitters, effects etc. + preview and texture tab. This may be hidden if the Particle Budget column is expanded. Click an item to view its properties; icons under this section are: create, delete, duplicate, move up, move down. The eyeball icon next to the various emitters lets you disable emitters globally.
The lower left column is the particle budget. For the PREVIEW only, this shows how many particles of each type are being used, which lets you figure out if you have enough particles of each type budgeted in the system. Note that particle systems used in the sim and not in the editor preview are NOT shown, so sadly you cannot use this to debug budget problems in the live sim.
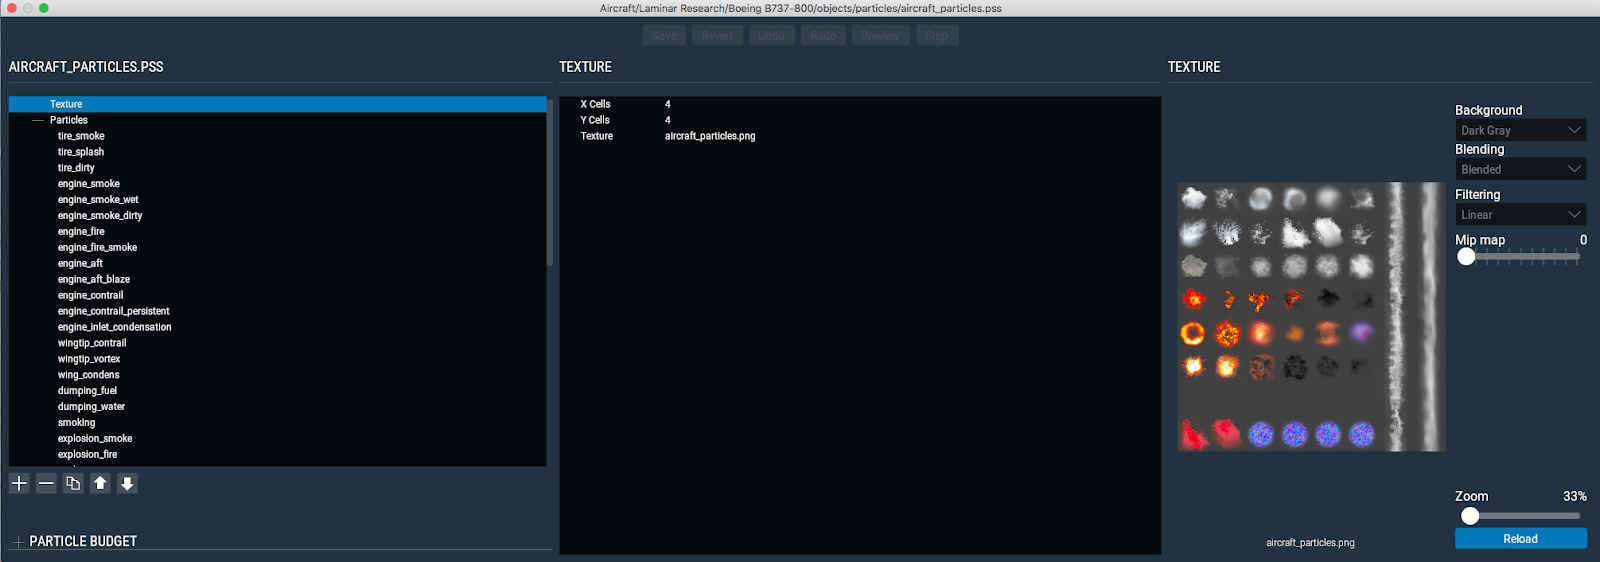
When “texture” is selected from the hierarchy, the texture preview appears on the right side.
The middle section is the property editor and is named for whatever is selected in the hierarchy. When an emitter is selected, the sub-emitters form multiple columns.
When a property that can be key-framed is selected in the middle view, the key frame editor appears on the right side. The add/delete buttons on the right let you add a second key frame table or delete the bottom one.
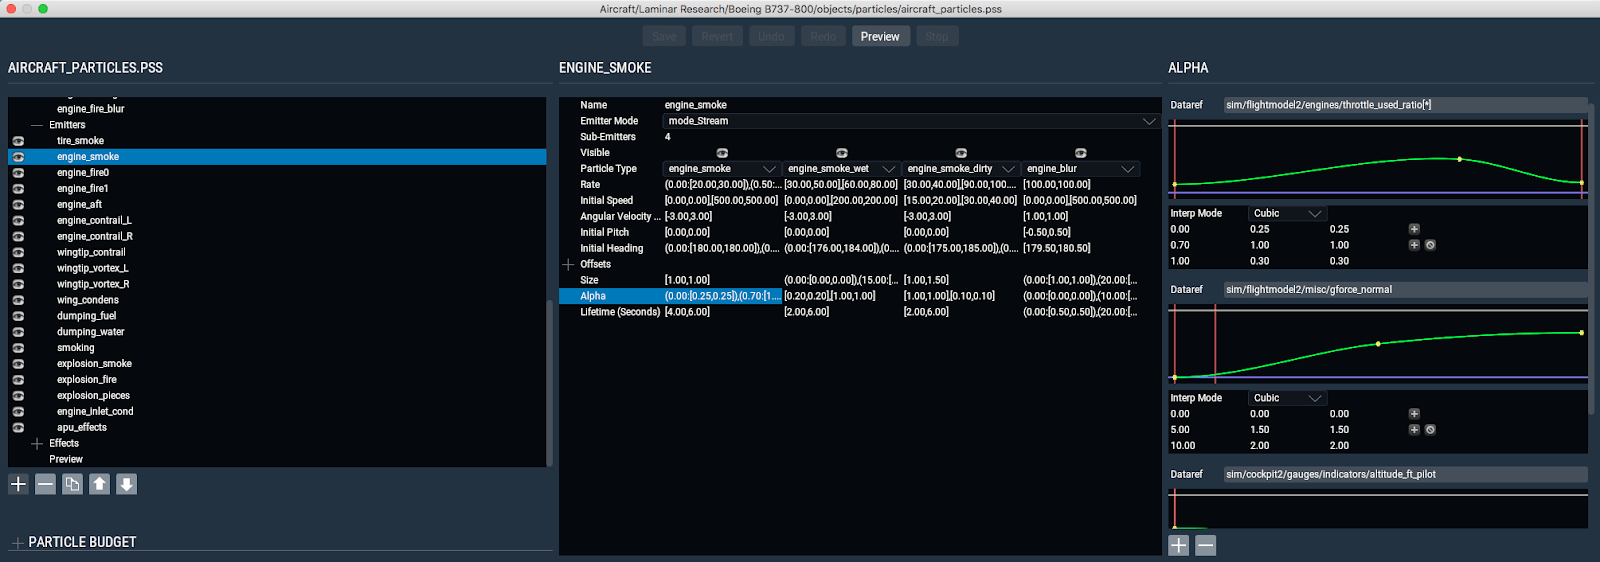
Each key frame table lets you pick a dataref or other key frame source, and then edit the key frame table either graphically by dragging nodes or by clicking. Option-click on a key-frame curve to add nodes graphically, or use the + (add) and ø (delete) icons on the right.
The key-frame interpolation mode popup changes the algorithm by which the key frame points are attached.
If the key frame property contains more than one value (E.g. two for a randomized value between two bounds or 3 for RGB colors) you can drag each line independently.
Top buttons provide access to: save/revert the .pss file, undo/redo edits, and preview/stop previewing the selected emitter or effect. (You cannot preview a particle type directly – you must preview an emitter that emits them.)
Particle Properties
These settings affect all particles of a given type. Some properties can be key-framed either by a dataref or by “particle lifetime”, which makes a property change over the life of each particle. When “particle lifetime” is used, the key frame table runs at different speeds for long-living and short-living particles.
Name: this is the name you see in the hierarchy – X-Plane ignores it.
Max particles: this is the maximum number of particles of this type you can have at once. The biggest you can set this is 16384. Set this large enough that the system does not run out of capacity, but smaller is better.
Physics Properties
Gravity: this is how heavily gravity makes the particles fall. Negative numbers make them rise. A value of zero means no gravity.
Drag: this is how fast the particles slow from their initial speed to the speed of the outside air – higher numbers give more drag. A value of zero means no drag.
Angular Velocity: this is how fast the particle billboard spins over the life of the particle.
Turbulence: this is how much each particle is randomly bounced around by turbulent air.
Collision Mode: this defines what happens when the particle hits the ground.
- None: the particle is not checked against the ground. This is the fastest for CPU – use this if you do not need to collision test.
- Bounce: the particle bounces off the ground. Set Elasticity to make the particle bounce more or less.
- Die: the particle disappears when it hits the ground.
Rendering Properties
Billboard Mode: this controls how the particle is drawn in 3-d.
- Billboard – the particle is a square and always faces the camera – good for smoke.
- Axial Billboard – the particle is a long rectangle, spinning around the direction it moves – possibly good for gun fire.
- Ribbon – the particle is a long connected chain of quads with the texture repeating – good for contrails that must be very long.
Blending Mode: this controls how the alpha of the particle is combined with the scene.
- Normal – the particle blends over the background, like a photoshop layer – good for smoke.
- Additive – the particle adds light – good for lights and explosions. Similar to how the OBJ lights work.
- Pre-multiplied – the particle is applied using “pre-multiplied” alpha – areas with opaque alpha act like ‘normal’ and areas with clear alpha act like ‘additive’. Your particle’s RGB must be drawn over a black background.
X/Y Grid Divisions: this defines the grid of texture cells for this particle. Each particle can use its own grid so that some particles can be big and some small.
Start Cell/Cell Count: this defines the list of cells that animate to draw the particle. The upper left cell is 0, and then they increase from left to right, then down, like a book.
Repeat: how many times the cell sequence repeats over the life of the particle.
Randomize: if checked, each particle gets a random texture cell and does not animate.
Animation Rate: this lets you customize the speed of the cell animation over the life of the particle.
Scale: this controls the size of the particle – it can grow or shrink over time.
Alpha: this controls how opaque the particle is – you can fade it out over time.
Length: for axial billboards only, this is how long the particle is (separate from the width).
Ambient, Diffuse: this controls how much the particle is lightened by the lighting conditions of the world.
Emissive: this is how much the particle creates its own light, so it is visible at night.
Tint: this is an RGB control that can ‘tint’ the color of the billboard if needed.
Emitter Properties
Each emitter contains one or more sub-emitters – the idea is to allow several emitters at a single spot (e.g. smoke and fire for a rocket) by attaching only one emitter in an OBJ.
Name: this is the name you see in the hierarchy – this is used to specify the emitter in the OBJ file.
Emitter Mode: this controls how particles are emitted.
- Stream: particles come out continuously over time. This is the default mode and is useful for smoke. You must use streaming mode for ribbons.
- Burst: a large number of particles are all emitted at once. This is used only for effects, and not for emitters attached to objects.
- Attach: a single particle is kept attached to the emitter at all times. This can be used to create a single ‘flame’ billboard on the end of an engine, for example.
Number of sub-emitters: change this to add and remove sub-emitters.
Sub-Emitter Properties
Visible: you can temporarily hide an emitter to remove its particles from the particle system preview. This is used only for authoring, and is not used in the final particle system.
Particle type: this selects which particle type the emitter emits.
Rate: this controls how many particles are emitted per second.
Initial speed: this is how fast the particles are moving when emitted. This speed is relative to the speed of the OBJ they are attached to (e.g. the airplane).
Angular Velocity Multiplier: this scales the rotation from the particle definition itself.
Initial Pitch/Initial Heading: this controls the direction the particle flies relative to the attached object. An emitter on an OBJ that is not animated (in the OBJ) and has 0 pitch and heading points in the negative Z direction (E.g. toward the nose of the aircraft).
Size: this scales the size of the particle itself.
Alpha: this scales the alpha of the particle itself.
Lifetime: this controls how long the emitted particle will live, in seconds.
Offset Properties
These properties offset where the particle is created relative to the emitter on the object.
Dx, dy, dz: these offset the emitter along the X, Y and Z axis of the object, in meters.
Longitudinal Offset: This offsets the particle along its emit direction (as defined by initial pitch and heading).
Lateral Offset: this offsets the particle in a random direction that is orthogonal to the longitudinal offset.
Initial Rotation: this defines the initial rotation of the particle billboard when it is born
When will the particle system be available to developers, this sounds great!
was wondering with the beta release of 11.30 can I add particle emitters to my WED project or .OBJ so I can recreate a small log file or smoke out of power plant stacks?
You add particles to OBJs but we don’t support scenery particles yet.
When
I want know too!
I want to make a niagara falls scenery pack with mist coming up. When will scenery have particles?
Ben,
We do need deflectors. To make the particles die, and bounce once. Why? With deflectors I can make the particles not go inside the cockpit or yes, if I want to, making them die when hit with the geometry.
And bounce, for example sparks after belly landing. So If I put a hidden 3d squared plane at the botton of the fuselage of the plane, the particles will bounce there, and not in xplane world, saving lots of FPS.
Thanks.
working more with particles, I see you have deflectors but only on ground. As said, it would be nice to have deflectors to collide with and not only make bounce or dye, but also appear new particles when hit.
A nice feature to allow not see some particles depending we are inside or outside, would be to allow to see them using the inside/outside feature of misc objects, as emitters are loaded in planemaker.
That way we could allow inside particles (I have lots of examples I could put to use inside particles)
Also I see the clipping distance of the particles are very near to the view eye. Could you please make it short? That way the internal view particles I mentioned before could be seen.
Thanks!
Hi, where can we find the Particle System Editor?
It seems that changes made to individual aircraft’s *.pss files are not being saved. Interestingly, hitting ‘save’ on the particle system browser does not appear to “do” anything, then upon closing the window, you are asked if you want to save your changes. The changes are not saved. Re-opening the *.pss file confirms that any changes made were not saved.
It would be nice to be able to disable this hokey thing. All it does is wreck my flights with bizarre little “particles” floating around the sky. Hate it.
Is there is a way to use custom datarefs in developing particle systems? Thanks.
How do I get a engine inlet smoke/condition in my default 737 from liminar?
April 2020 .. Can we add/ see particle effects on scenery objects yet?
No. Only airplanes and plugin objects.
Thanks for that amazingly fast response…any chance of a pointer to where I might find docs/examples on particle effects on plugin obj’s?
I’ve been trying that but must be missing something obvious.
I finally found this. Super useful. Got the answer I was looking for. It wasn’t specific to effects on plugin objects, but I was able to figure it out after watching his video.
https://www.youtube.com/watch?v=0Fhq6F-hZxw
In case the link gets culled : Search Youtube for Sim VRlabs “X-Plane Particles Tutorial – Add particle effects to your aircraft”
Thanks Sim VRlabs and thanks again Ben for your quick reply.
Where i can see any example for plugin objects? I searched on forum, but all themes is not solved.
what type of objects are the plugin objects you mentioned?
I’m controlling an .obj file using a plugin(controlling its motion) exported as a scenary (can export it an aircraft part, but still as a .obj file) from Blender using xplane2blender. I can add the emitter and particle system (.pss) before exporting the .obj, but it’s not working.
can you clarify please what is the type of plugin object that you’re talking about?
Working on a Hamburg City scenery, I’d really appreciate a way to put particle emitters into a scenery objects so I could recreate this:
https://de.wikipedia.org/wiki/Alsterfont%C3%A4ne
There’d be a handful of other applications in scenery of course, like waterfalls, animated ship wakes, truly user-definable smoke stack emissions, maybe waves that look a lot less cheesy than just shoving static textures onto beaches… 🙂