Download it here: XPlane2Blender v4.0.0-alpha.5, aka LODs
XPlane2Blender v4.0.0-alpha.5, aka LODs
As always, make backups! This includes making backups before saving a 2.79 file in 2.80. There is no going back from that!
Override LODs feature and backwards compatibility
A quick LODs recap
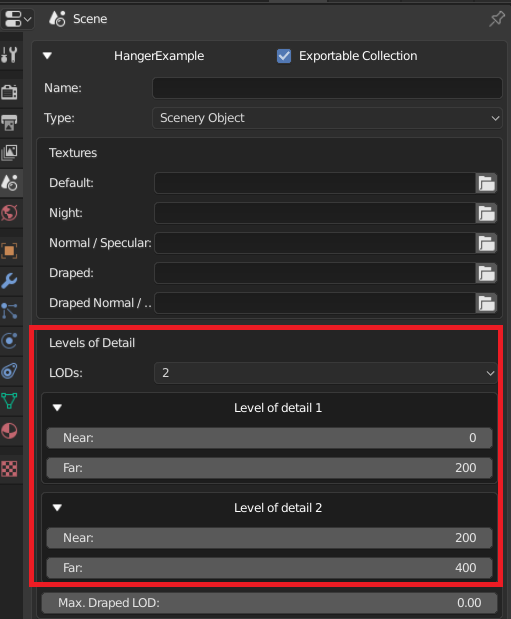
This release includes the last must-have feature for 2.80 – LODs. For those who haven’t used LODs before, it stands for (Levels of Detail). It is a way of defining what to draw when the camera is a certain distance away from an OBJ. In XPlane2Blender we call those ranges “buckets” and put Blender Objects (meshes, lights, armatures, empties) “inside them”. For instance, suppose an OBJ of a hanger with 2 defined ranges (buckets) 0 to 200 and 200 to 400. It has two meshes “HangerDetailed” (bucket 1) and “HangerLowPoly” (bucket 2).
When the camera is close (0 to 199 meters), only the “HangerDetailed” mesh will be drawn. When it is far (200 to 399), only “HangerLowPoly” will be drawn. At 400 meters and above, nothing will be drawn. This is very useful for increasing the performance by not drawing what is too far away for the pilot to see.
There are two styles of Level Of Detail: Additive (where every bucket starts at 0) and Selective (where the end of one bucket and start of the next are equal (see example above)). Use one or the other depending on what you need to draw when; don’t mix between them.
LODs Mode in XPlane2Blender
Using LODs in XPlane2Blender is very easy: Define the ranges (buckets) in the OBJ settings, and tell Blender Objects which buckets they should go in.
“LODs Mode” is considered On when you have specified a number of LOD buckets in the OBJ settings.

This means that:
- LOD validations are on (see later section)
- Objects must be placed into defined buckets or they will not be drawn. This is where the new “Override LODs” checkbox on Blender Objects comes into play.
[Picture]
The LODs feature works just like 2.79’s Layers Mode LODs, with a new time saving feature and some very small backwards compatibility notes.
Override LODs
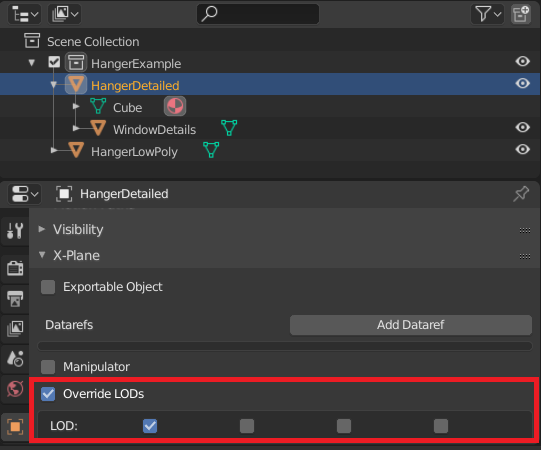
- In the Object Properties Tab of the Properties Editor, you’ll see a new “Override LODs” checkbox.
- When checked, the familiar 4 LOD bucket choice checkboxes will appear.
- Specify which buckets an Object will go into. All children below it will also go into the same buckets. Children who also override LODs will pass their new choices on instead.

In this picture HangerDetailed has its “Override LODs” checkbox checked,
and has been placed into bucket 1. Its child, WindowDetails, will
automatically be placed into bucket 1 too.
An Object’s LOD choices will only be used if “Override LODs” is checked.
The idea is that just a few objects in the Blender Hierarchy will need to override the LOD choices, and old projects can be quickly reorganized to take advantage of this new feature. Inheritance will greatly reduce data entry.
Backwards Compatibility
There are only a few differences from 2.79 to be aware of
| Backwards Compatibility Concern | Resolution |
|---|---|
| In 2.79 “No buckets chosen = Write to every LOD“. In 2.80 “No buckets chosen = Object not written“ | Use the new feature to quickly specify which objects should be in all buckets |
| 2.79 Layers Mode projects did not have an “Override LODs” checkbox, LOD choices hidden | Your old choices are remembered. Use the new Override LODs feature to quickly get the OBJ correct again |
| 2.79 Root Objects Mode used layers 1-4 to put Objects into buckets | Quickly restore your project like this: Make an Empty for each layer used, override the Empty’s LOD buckets, and re-parent the objects so that all Objects are in their former buckets. If an object was used on more layers, make more empties to organize these cases |
LOD Validations
For mistakes like not starting the first bucket at 0, having gaps or overlaps between ranges, and etc, an error will be emitted in the log.
Other Bug Fixes
- #518 – When Export Type is “Cockpit” LOD buckets is now shown.
- #512 – “Deck” (a rarely used Material property which controls how planes collide with this surface and the area beneath it) is now renamed to “Only Slightly Thick” implying that this collide-able surface is “Only Slightly Thick” as opposed so something that “extends the earth up to that surface”. Imagine a bridge that could not be flown under because under it is “an invisible mound of rock and world surface” vs a bridge that can be flown under because “its deck is only slightly thick”. Get it? Well, maybe the new name will make more sense to everyone without needing to know this example.
- #511 – People will now be able to use a Particle System File again
- #276, #525 – Some UI cleanup. “Scenery Properties” will no longer be shown when Export Type is Aircraft or Cockpit, “Autodetect Textures” is no longer drawn because it doesn’t do anything and confuses people on how to use an essential feature: specifying texture paths. The value isn’t removed and one day we’ll have that feature back in some form.
Many thanks to all the people who e-mailed me and helped me design the new LOD feature. This is an alpha feature so if the overall response is “this isn’t doing what we need” it can be ripped out, but, I think it will meet expectations. Also, especially tell me if it difficult to take a 2.79 project with LODs and make it work again. The goal is that it an artist should be able to do it in about 5 minutes without the use of an updater for most projects.
I’m so glad to be working on a project with users who are very willing to send in good bug reports and great constructive feedback and criticism! Very refreshing! As always, if something goes wrong write a bug report (preferable) or e-mail me!
Very interesting: I didn’t know about LODs until now. Naturally this is what painters do (reduce details of distant objects) in static scenery. Two thoughts:
I think it would help more bugs to be reported if (in addition to the log) bad LODs would be highlighted (r.g. bright green) in the scenery when the problem is detected.
To be effective LODs should be a tree (or even a forest) of objects: If a building has walls, windows, a roof, etc., each being a LOD, at some distance the whole building should be just a “gray brick” before vanishing; i.e. not only reduce the details of each object, but also reduce the number of LODs.
Finally: Do LODs also interact with visibility? For example if it’s foggy you won’t see much detail even at short distance in real life. Can clouds and rain also be LODs?
Ben says that we do not currently factor in fog and visibility decreases from rain and clouds. I’m not sure about future plans, but obviously we want to squeeze the most performance out of X-Plane. If something isn’t visible to the player, we don’t want to draw something then draw a cloud on top of it!
This is not to comment on any other performance tricks we pull, I really don’t know much about how that part of the code works. So, don’t make any assumptions anybody.
Right – if something is _absolutely_ not visible (e.g. 10 mile vis and it’s 100 miles away) it gets _completely culled_.
But if a building would go from the 1st to second LOD (and reduce complexity) at 1 km, we don’t rescale that to 100m because it’s foggy. This is because we assume the LOD is based on size on the screen – something might be fogged out but still relatively big on the monitor, so the details are needed.
Well, I understand that you are looking for “realism instead of frame rate” solution, while some users (e.g. me) would prefer some “frame rate instead of realism” (to some extent at least).
What do you think are candidates for rendering options that could/should improve the frame rate? Which of those could be adjusted dynamically/automatically as needed?
Ted – thanks for publishing this update. Love the collection stuff – it has greatly simplified the export process for me.
EM