One of the less fun aspects of X-Plane 8.50 was dealing with driver bugs. The basic problem is that PC hardware vendors have a relatively slow cycle for updating the software they bundle with their machines; while the companies that write drivers (ATI and nVidia) have a pretty high latency from when they first ship a card to when the driver support is to the level that X-Plane needs.
The clearest case of this I saw during 8.50 was in the case of PC users with “1.5”*-type ATI drivers. These drivers will cause the terrain textures to swim when hardware-accelerated runway lights are used. Upgrading to “2.0”-type ATI drivers fix the bug. A lot of users were just fine with the 1.5 drivers that came with their machines until X-Plane 8.50 came out, and have only now updated.
8.50 started using pixel shaders; hence the need for newer drivers with bug-free pixel-shader support. But in the future we’re going to move from “DSP”-type shaders (that is, shaders written in a very low level language) to shaders writen in a GLSL, a high level abstract way to write shaders.
My fear is that this will induce a second round of “update your driver” for PC and Linux users. (Apple ships new drivers with system update, so users of the current Mac OS can usually just run the updater if it isn’t set to update automatically.) But I think it’s probably for the best that people use the latest drivers, as ATI and nVidia put software changes in the drivers that increase the throughput of the graphics card, through smarter use of the hardware.
The one group that is really stuck is Macintosh 10.3 users; Apple doesn’t provide driver updates to older operating systems. So for example users with 10.3.9 and an ATI card with pixel shaders can’t get hardware-accelerated texture lights without buying OS X 10.4. I would go as far as saying that in the future if you have a pixel-shader card it might be worth buying an OS upgrade to unlock the driver support needed to use these features.
Why move to GLSL (and require more driver updates)? In the long term it will provide superior framerate. The current shaders we have now are written in a very low level language, that roughly matches the technology of the first generation pixel-shader cards (Radeon 9700 and GeForce “FX” series). As cards gain new capabilities, Austin and I can’t take advantage of the new capabilities using this old language.
GLSL however is a higher level language; when we write a shader in GLSL, the graphics driver translates our shader into code specific to the video card at hand when X-Plane starts. This means that if the video card has some new magic trick it can do, the driver can take advantage of that trick as it translates our shader, resulting in higher framerate. And everyone loves higher framerate. 🙂
EDIT: who will be able to use GLSL? Basically any card that has hardware-based pixel shaders** from ATI or nVidia will support GLSL-based shaders if you have a modern enough driver. So if you are seeing hardware-accelerated runway lights in 850 then the GLSL changeover shouldn’t cause any more fuss than a driver upgrade if you haven’t done one rcently.
Also I should say that if I sound like I am dumping on ATI and nVidia for driver bugs, I shouldn’t be; video cards are amazingly powerful, the drivers are very complex, and the technology jumps by huge amounts in a very short time period. I believe the level of driver bugginess we see is a function of fast technology rollout and not the competence of the driver teams, who I am sure are working as hard as they can.
So we, the developers who write programs that use these cards, and you, the users who enjoy these cards, have to ask whether we’d rather have faster framerate and more eye candy or less chaos from our drivers.
*ATI drivers are numbered by ATI to match ATI’s internal versioning scheme. But X-Plane can’t really see what the ATI driver version number is (e.g. the catalyst version number). So when I say 1.5 or 2.0 I am really talking about the OpenGL specification number that the driver implements. ATI implements newer specs in newer drivers, so we can tell that an ATI driver that supports the 2.0 spec is newer than an ATI driver that supports teh 1.5 spec.
So while I have no idea of either which versions of the ATI drivers had this bug or which version it was fixed in, but we can tell from an X-Plane Log.txt file whether the drivers are going to have this bug.
**Hardware-accelerated shaders? Well, previously I’ve described a graphics card as either having shaders or not, but this isn’t totally accurate. Technically a shader can include a non-programmable shader. Furthermore the driver can present software emulation of a shader. For example, the Intel GMA950 has programmable pixel shaders in hardware. On a Mac the driver reports that it has vertex shaders, but the vertex shadings is actually done by the CPU. (This isn’t unreasonable — all vertex processing is done by the CPU on the GMA950.)
So really when we talk about “cards with shaders” we mean: any nVidia card with a number of 5000 or higher (plus some Quadros, sorry I don’t know the numbres on those), and any ATI card with a number of 9500 or higher, and any ATI card with an “X” in it, e.g. X850. At this point we’ve had shaders in cards for 3 generations, so if you buy a new computer and it has an ATI or nVidia graphics card, it should have fully programmable hardware shaders.
Of course now not all shaders are equal; the newest cards have even more powerful shaders. But this isn’t likely to matter a whole lot to X-Plane for a while. But generally I’d recommend buying the mid-range latest generation cards over high-end obsolete cards at this point.
Posted inDevelopment
by Ben Supnik|Comments Off on That was so fun – let’s do it again!
(This one’s gonna be a little bit political I fear. More scenery-related stuff in a few days!)
The last software patent on GIF expired October 1st 2006. It’s very rare that I agree with Richard Stallman on much, but I think he presents some strong arguments against software patents in this speech.
X-Plane never used GIF; we’ve used PNG as our main graphics format for a while now…here‘s a history of PNG’s development, relating to the problem with GIF being patented.
A few comments of my own:
One problem with software patents is the “landmine” effect. There’s no way to know as a programmer when we’ve violated a software patent. (Try searching the patent database for an hour or so and I think you will agree with me on this.)
The bar for non-obvious patents is completely miscalibrated. Software engineering is all about building black boxes out of past work and rearranging them to do new things. Allowing the arrangement of past technologies to be patentable is like allowing a mason to patent a particular stacking of bricks; to most masons it should be obvious how to stack bricks for a certain job, and any good programmer should know how to generalize past ideas to solve new problems. This isn’t invention, it’s implementation!
Patents aren’t based on natural law and human rights, they’re based on fostering creativity. To this end patents are the exact wrong solution for software, where having basic interoperable technologies be free and cheap is good for common infrastructure. Software patents are like someone being able to charge a toll for driving at exactly 55 miles an hour. We want everyone driving the same speed because it’s good for the traffic system; similarly we want people to all use the same file formats because it makes all programs more useful.
There are two cases of software patents I can imagine: short-lived ideas that will be obsolete by the time the patent is ever defended; these patents at best serve to help one company beat another over the head with lawyers; I think this is comparable to a SLAPP lawsuit.
The other case is when the idea is truly useful for its entire lifetime (see GIF, which became the only way to put transparent graphics on the web for a while). In this case the result is a stifling of interoperability and innovation and the patent is to the detriment of the industry and all of its users.
To this end I see libpng as a perfect success: a well-designed file format that’s free of patents implemented in an easy-to-use high performance library that’s free (X11/MIT license). This encourages and makes it easy for everyone to use PNGs which makes all programs work better. Would we be better off if Austin and I had to invent a proprietary image format (with our own inferior compression) because the major formats were patented?
(Would it be feasable to license such a format? I don’t think so – see Stallman’s comments on the number of components in a software program vs the cost of licensing.)
First a disclaimer: DO NOT SHAKE YOUR LAPTOP!!! If you shake or thrash your laptop and kill yor hard drive, do not blame me. Laptops are delicate complex electronic devices and should not be jostled, beaten, dropped, abused, or tossed around.
Okay with that out of the way, a stupid plugin trick. This is only for Mac users with a MacBook, MacBook Pro, or possibly some of the newer G4 laptops (although I haven’t tested on these).
First, download “SMSHack.xpl“. Unzip it and drag the .xpl file into your plugins folder.
Start X-Plane. In an external view, rotate your laptop about 45 degrees to the left and right and 45 degrees up and back. this calibrates “SMSHack” to know the orientation of your computer. You must do this calibration every time you use SMSHack.
Then: fly using your laptop like a yoke. Roll your laptop to roll the plane, and pitch the laptop to climb and descend. Disable the plugin to get normal joystick control back.
How it works: I use a library called Unimotion. (Hrm..it’s LGPL…well, source is here then.) Unimotion reads the SMS (sudden motion sensors) on modern Mac laptops. These are three accelerometers that the Macintosh can use to detect it has been dropped; the operating system will try to park the hard drive heads to prevent a disk failure on impact.
Because gravity is a constant acceleration on the laptop, the accelerometers can be used to detemrine the roll and pitch of the laptop. This plugin simply shovels the relative accelerations into the joystick deflections.
Now that I’ve covered how to use X-Plane with command-line options and how to write up performance bugs, we can discuss the framerate test, why it exists, who should use it, etc.
The X-Plane built-in framerate test serves three purposes:
To let us compare our current performance to past performance easily (so we can detect code that hurts sim performance early in our development cycle). This also lets us rapidly determine whether bug reports of “my framerate sucks” are valid or not.
To allow graphics-card driver writers to use X-Plane to benchmark and regress changes to their drivers.
To give us an easy way to get “hard numbers” in-field – that is, when a user emails us with a tech support request saying “my sim is slow”, the fps test allows us to determine whether the problem is based on configuration.
I’ve spent a lot of time in the X-Plane 850 release cycle looking at performance, both with the help of users (e.g. instructing users on how to look at their own machines) and my own. For all the complaining I’ve done I must say: THANK YOU to all of the users who have helped with performance analysis. These users put in a lot of hours doing mundane test after test and they did a great job of emailing me back information, fps reports, screenshots, and even a Shark profile or two! Even when the result is “hrm – everything is normal”, this kind of information is valuable in helping us prove that our release is solid. (And all of the indications I’ve found indicate that 850 is solid.)
But the process was very time consuming and error-prone. The frame-rate test simplifies things for everyone; the test is standardized and requires no user intervention; it runs the exact same settings every time and is not subject to software configuration issues. The reports are automatically printed out and require no observation.
We are adding the test into 850 so that in the next release we can compare to 850 and be sure we’re on track. I only wish we’d have the test in 840!
Should I Be Using the Framerate Test?
If you are not a developer/programmer and you are not asked to use the framerate test by a programmer (for example, in response to a bug report or after emailing tech support) there is no need for you to run the framerate test. You can run the test and email your friends (especially if you have higher framerate than they do) but if you have problems with the framerate test and you are using it “recreationally” please do not file a buf report or query tech support for help. The framerate test is an internal development tool; X-Plane is meant to be used to fly!
What the Test Does:
The framerate test runs X-Plane with preference reading/writing disabled, and it changes the ‘default’ configuration (e.g. X-Plane’s configuration without preferences) based on command-line input. This gives us a specific setup of the sim regardless of how the sim was last used. The preferences are not saved to disk when the test is done, so there is no need for a user to delete preferences to get solid test numbers. User alerts are not shown (just logged) so that the test can be run from a shell script automatically. The sim logs info and quits when it finishes.
The performance test can run in two modes: analysis mode and pass-fail mode. In analysis mode, the sim is run in three 30-second tests: panel view, forward view, and forward-view paused. These three numbers help us tell the relative framerate loss due to the panel and the flight model. The fps-test is primarily aimed at the 3-d rendering engine, but on a CPU-limited machine the flight model can have a huge impact, and on a PCI/AGP bandwidth limited or VRAM-limited machine the panel can cause a noticable slowdown. (The panel also hurts if a machine is extremely blend/fill-rate limited, like a Rage 128, but you shouldn’t be using X-Plane 8 on a Rage 128!)
The pass-fail test runs a single test, paused with the panel to gauge pure framerate, and returns 0 or 1 (as a command-line shell app) to the calling script based on whether the sim passes a minimum framerate. The pass-fail test is designed for automated testing; you can put X-plane into a series of standardized tests and automatically send an email if the sim’s performance falls below a certain minimum.
How to Use the Framerate Test:
First, see my instructions on how to use X-Plane with a command-line option. In these examples I will simplify the X-Plane executable name; refer to the instructions for your specific operating system.
To run the frame-rate test, use this:
X-Plane --fps_test=2
Where the number is a fps-test “test number”. (I will explain the numbers in detail below.) This will run the 3-part analysis test and quit. You can add other command-line options as well; for example, to compare performance with and without VBOs you can do this:
X-Plane --fps_test=2 --no_vbos
(Side note: on fps-test 1 pass-fail I see 71 fps on my MacBook Pro with VBOs and 59 without. Turning off VBOs definitely hurts performance, so only users with serious driver bugs should be using the –no_vbos option.)
To run the pass-fail test, you add a second command-line option:
X-Plane --fps_test=3 --require_fps=20
This will run the pass-fail test and return a positive result if the frame-rate is at or above 20 fps. For example, you could write a test like this:
X-Plane --fps_test=2 --require_fps=20 || echo We were below 20 fps!
Test Numbers:
The framerate test number is up to 3 digits controlling various aspects of the sim:
The ones digit can be 1-3 and selects the rendering settings; 1 = very low and 3 = very high. You can view the rendering settings while the fps test its running (it will ruin your test results of course to put up dialog boxes).
The tens digit can be 0-6 and programs in a variety of weather and visibility conditions.
The hundreds digit can access a few special features: 100-series tests use a far view angle and 200-series tests run at night.
We may invent more tests later on but this initial set lets us run the sim in a wide enough envelope to gather the data we need.
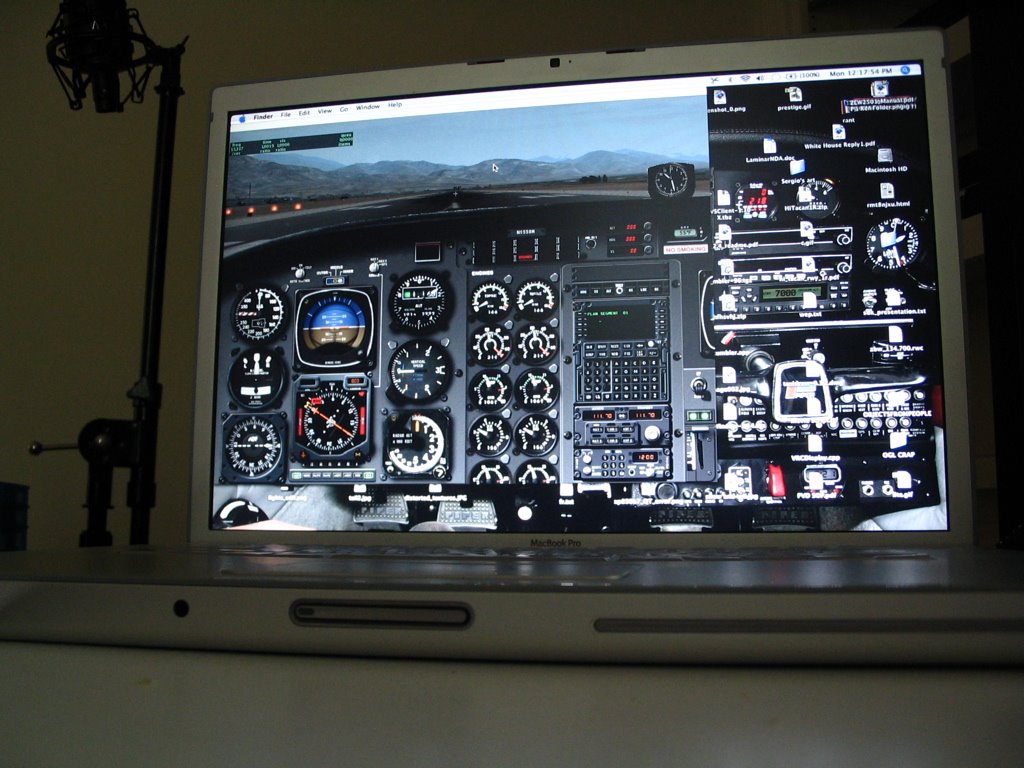
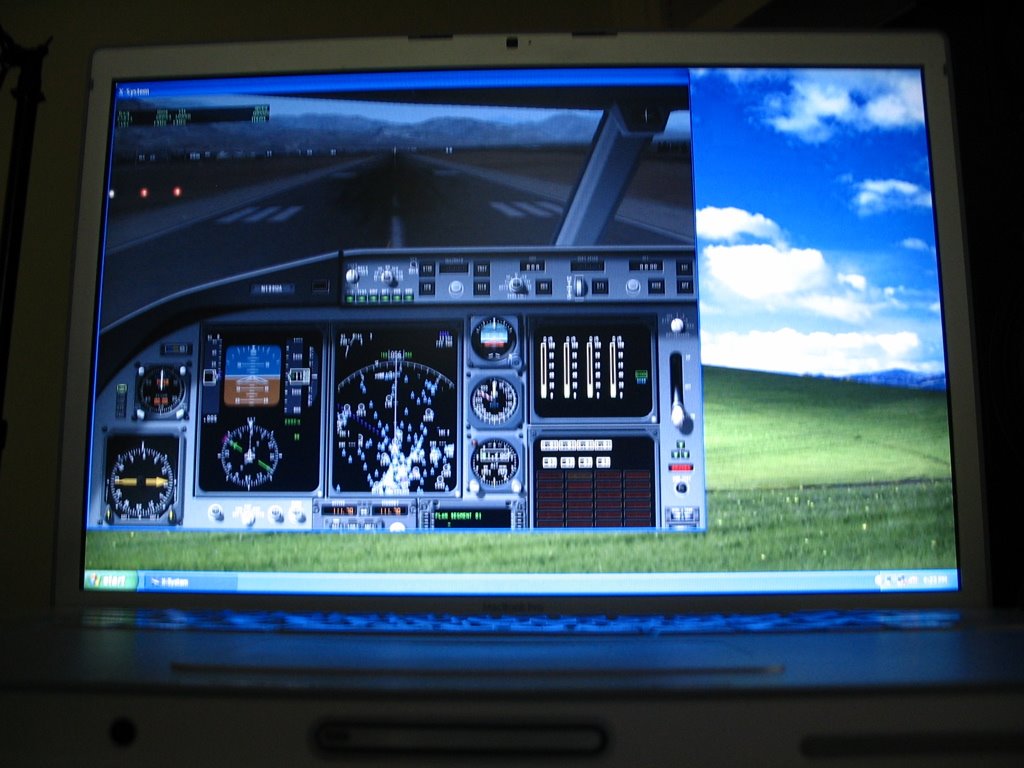
In a vain and foolish attempt to prove that I am the uber-nerd, I have configured my MacBook Pro to boot Mac OS X 10.4, Windows XP Home SP2, and Ubuntu Linux 6.06. It took a while to get everything set up, but all three now run X-Plane with hardware acceleration.
This provides a unique chance to compare the performance of the sim varying old operating-system factors (the OS, the drivers, and the compiler). The machine is a 2.16 ghz DuCore MacBook Pro with 2 GB of RAM and a 256 MB ATI X1600 card.
So without further delay, here are the numbers. Speed is in fps for frame-rate tests 1-3 (1 is lowest settings, 3 is very very aggressive). Each set of fps is for panel view, forward-no-HUD view, and the same view paused. Load times are in seconds for the KSBD demo DSF. The second load time is to reload the same scenery – the times are much faster on all 3 OSes because of the disk cache.
Drivers are not tweaked; this is simply the ATI binary drivers for Linux, whatever Apple ships in BootCamp (some 2.0 series ATI drivers) for Windows, and the 10.4.8 drivers for Mac, none tweaked in any way at the OS/control panel level. For Linux I disabled VBOs because they cause graphic corruption in some cases and slow frame-rate. This is probably a Linux/ATI driver bug.
PLATFORM      Mac         WIN        LINUX
Load/Reload   2.77/1.31   5.02/1.33  3.05/1.04
FPS Test 1    65/71/80    64/69/88   56/62/62
FPS Test 2    49/55/54    50/56/56   34/37/37
FPS Test 3    15/15/15    16/16/16   4/4/4
Analysis:
The Mac has the fastest disk performance; both Mac and Linux are significantly faster than Windows in raw loading. For reloading a file all operating systems are about the same, but it’s the load-without-cache case that counts.
Windows has the highest frame-rates; slightly faster than Mac but quite a bit more than Linux. The lack of safe VBOs on Linux could account for this.
In the case where the fps didn’t rise when the sim was paused, the limitation is with the video card – not surprising for tests 2 and 3 where there’s a lot of antialiasing, anisotropic filtering, and objects.
Tomorrow I’ll blog about how the fps test itself can be used.
Normally you just double-click X-Plane to launch the sim. But X-Plane 850 has some hidden command-line options. We provide these for in-field debugging; if you hit a problem such as a bad video driver you can trigger special options within the sim that aren’t exposed in the settings dialog boxes.
Macintosh Users:
To run X-Plane using command-line arguments, you must launch X-Plane using terminal.
Open the utility “Terminal”; it can be found in the Utilities folder (within the Applications folder). Terminal gives you a command-prompt.
Drag your X-Plane application into the terminal window. The command line will list the names of all of the folders leading to your copy of X-Plane using / for directories. All spaces will be preceded by \ characters.
Delete the extra space at the end and add the following to the command-line:
Contents/MacOS/X-Plane
After the word X-Plane you can include command-line options.
This would launch X-Plane 850 RC-3 (in the X-Plane 850 folder of my hard drive “GIS”) using the –no_sprites option.
Windows Users:
To Lauch X-Plane from a DOS prompt you will have to…
Pick “Run…” from the Start menu. Type cmd (3 letters) for the name of the program and press return. This will open up a DOS prompt.
Type cd and a space and then drag your X-Plane folder into the DOS prompt window (the full path of the file will be typed). Press return. This will move your command prompt to the X-Plane directory.
Drag the X-Plane application into the DOS prompt window. You will see its full name in quotes including the hard disk and directories separated by back-slashes.
You can then add any additional command-line options.
An example from Windows:
"X-Plane 850 RC-3.exe" --fps_test=1
(It is necessary to change directories on Windows to make sure that Log.txt and other files are put in the right place. On Mac these files always end up in the X-System directory.)
Linux Users:
X-Plane can be launched like any other command-line tool; you may need to prefix it with ./ if you don’t have the current working directory in your search paths. For example:
cd /home/bsupnik/X-Plane\ 8.50\ RC-3/
LD_PRELOAD=/usr/lib/libalut.so ./X-Plane-i586 --fps_test=1 --require_fps=20
On my distribution (Ubuntu with GNOME, stop your snickering!) it is not possible to simply drag the application into a terminal because the spaces in the file paths will not be properly escaped.
Command Line Options
Generally X-Plane command line options have full names and two dashes. Some require parameters, as in =1. Order does not matter and you can use as many options as you want. Some examples (simplifying the application name, which varies by version and OS):
I’ll hold off most of my comments until RC2 comes out; we thought it would be out a while ago but Austin had to go on a business trip. (So really this is RC3, because we’ve put more bug fixes in since RC2 almost came out but didn’t. Heck I have no idea what number Austin will give this build!) Anyway, new build should be out soon and then I’ll discuss some of the new features.
One thing I’ve looked at a lot over the last few days is anisotropic filtering. Basically anisotropic filtering is when the graphics card looks at more of a texture to make it look better when it is sloping away from the viewer.
X-Plane provides the graphics card with several versions of each texture in different sizes; depending on how far away the polygon is, the graphics card picks the right size for the best look. This is called mipmapping. It allows the graphics card to draw a very small version of a texture without having to do the work of scaling it down. Essentially the textures are pre-scaled to every possible size we could need. (But never bigger than the original size, modified by your texture resolution settings.)
The problem comes when a texture is sloping away from us. Consider when we are sitting on the runway at KSBD. The close part of the runway is just huge and requires the biggest version of the texture we have. The far end requires the smallest version. Anisotropic filtering allows the graphics card to look at extra data to preserve the details as the size it needs gets smaller. (I realize that that is probably the worst explanation of anisotropic filtering ever written, but I don’t want to get into the math…Google or Wikipedia to the rescue.)
Basically there are three things a user must know about anisotropic filtering:
Anisotropic filtering makes a texture that is sloping away from us less blurry.
The graphics card uses more texels (pixels from a texture) to render when it is on – 8x anisotropic filtering means the card can use 8x as many texels. That can really hurt framerate.
What the card actually does is up to the hardware maker and driver writers. X-Plane just says “give me 4x” and hopes for the best.
Before X-Plane 850RC2 X-Plane only had a check-box…on or off. If anisotropic filtering was on, it was on maximum, which is an outrageous 16x for some cards! This gave you two options: a blurry world or a huge frame-rate hit.
Austin is working on complete anisotropic filtering control – that is, you can select the level of filtering from 1x to 16x, but with all the intermediate levels. The sim will default to 4x, which I’ve found is a good compromise of speed and image quality. So hopefully this will allow some users who had to leave anisotropic filtering off to get a little bit of filtering without a big frame-rate hit. I suggest you try changing the level on your computer and see what looks good and what is fast.
One thing I must admit: we’ve always had anisotropic filtering on the runways, and we will continue to always leave this on. It simply makes a huge visual difference in this one situation where we know that you will see our textures at a horrible viewing angle. X-Plane 850 RC2 is a little bit more polite than RC1 was; whereas RC1 and all previous versions maxed out anisotropic filtering on runways, RC2 will not increase it beyond 4x unless you set the rendering settings to do so.
One last mostly unrelated note: the high resolution earth orbit textures make the sim look nicer but hurt framerate. But they hurt framerate more if anisotropic filtering is higher. So this is a reason to carefully pick the amount of anisotropic filtering you want.
Previously I blogged that birds, planets cars and reflections all are new to 850 and eat fps. Here are some more ways we can lose framerate:
If you compare your upgraded-to-850 full install against a quick download of the 840 demo, the comparison isn’t fair; it turns out that having full scenery installed is slower than having just one tile.
The very nice demo KSBD layout Austin G. made us hits frame-rate a bit, with all of the lights, painted lines, and curved pavement.
What’s strange is the amount that these things affect the sim. One user reported a 30% loss to extra scenery and 50% loss to the KSBD layout. By comparison Austin’s layout is virtually “free” on my G5.
I am investigating ways to simplify complex airport layouts when settings are low. Regarding the fps loss when more scenery is installed, it turns out KSBD is relatively close to the edge of the DSF. So even though you can’t see water in the next tile (when you have the demo) it turns out a little bit is being drawn; X-Plane doesn’t know that the mountains hide this.
If you try this test while looking to the left (north into the center of the DSF) there is almost no difference between demo and full scenery.
I’ve always thought we should come up with cool marketing names for new code in the sim. Look at ATI and nVidia. When they reduce the amount of VRAM on their cards and steal your system memory, they don’t call it “hey, we’re cheap bastards so we left off some chips and hijacked yours instead”. Instead they call it “TurboCache™” (nVidia) or “HyperMemory™” (ATI). Don’t those sound much better?
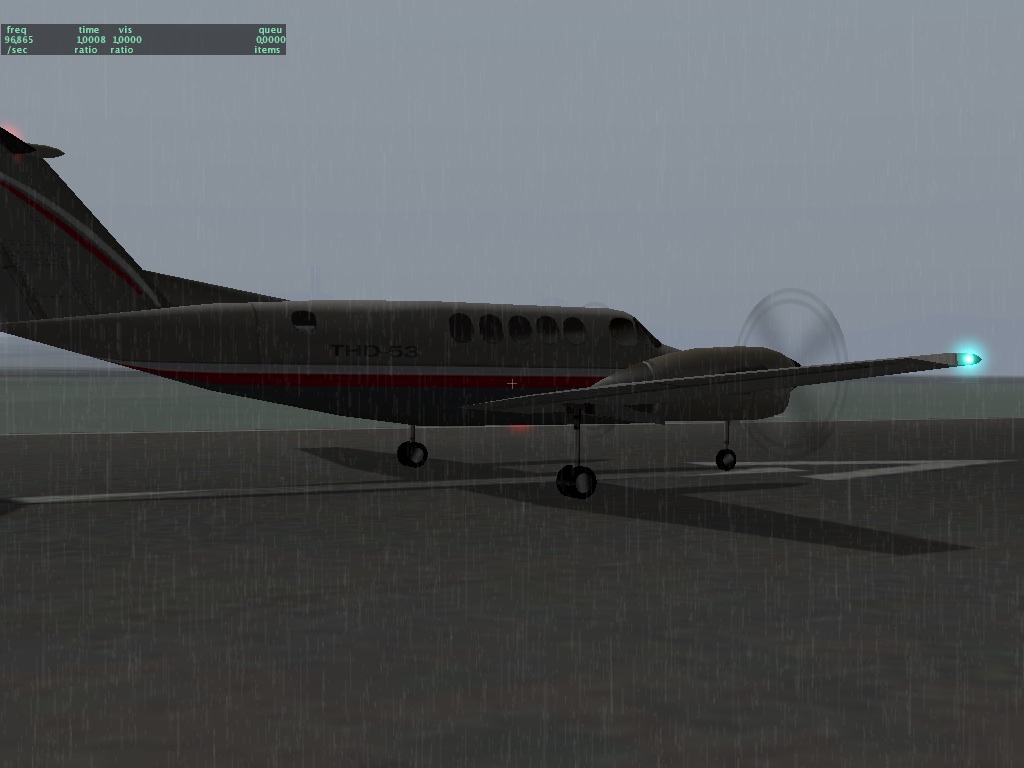
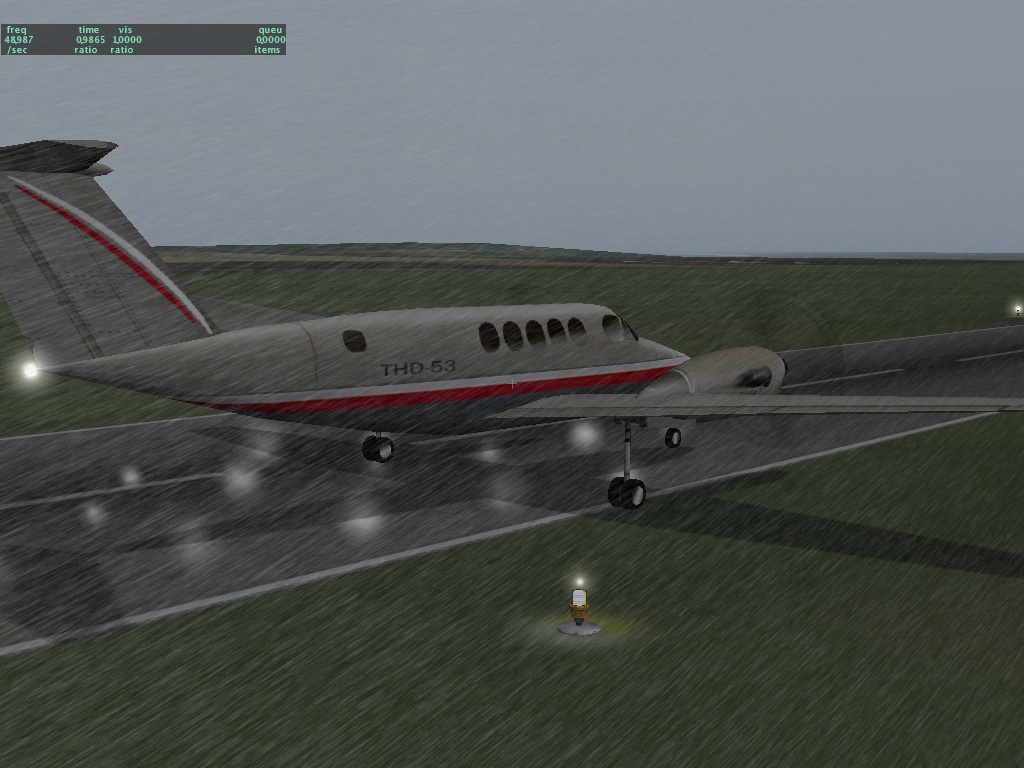
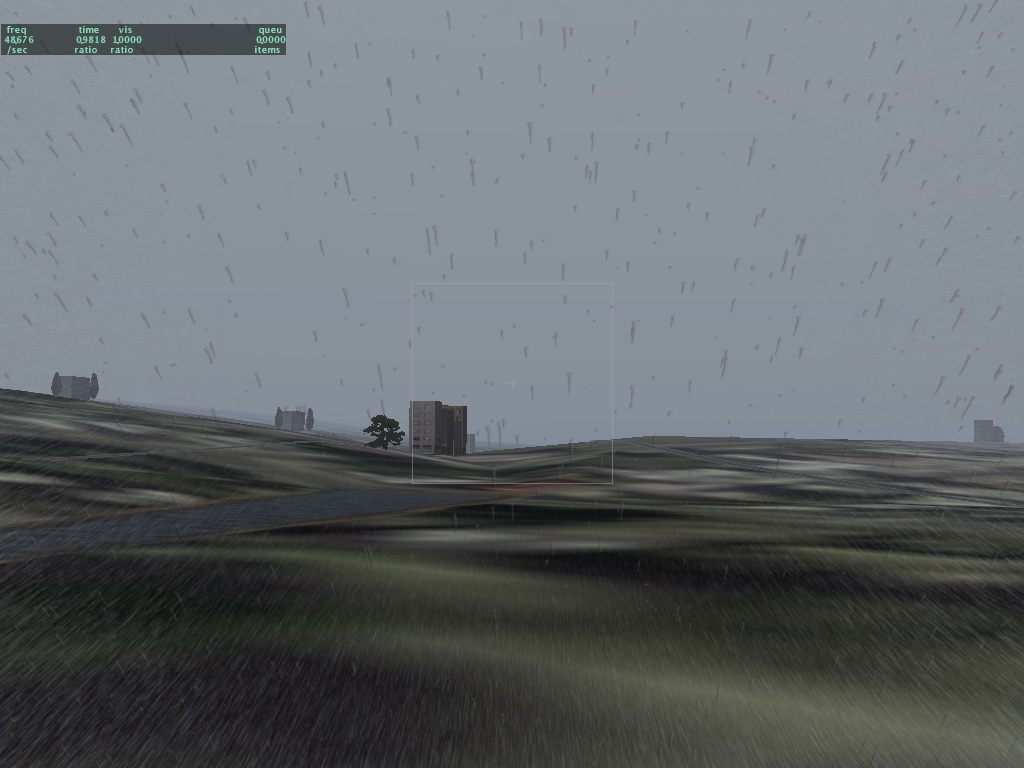
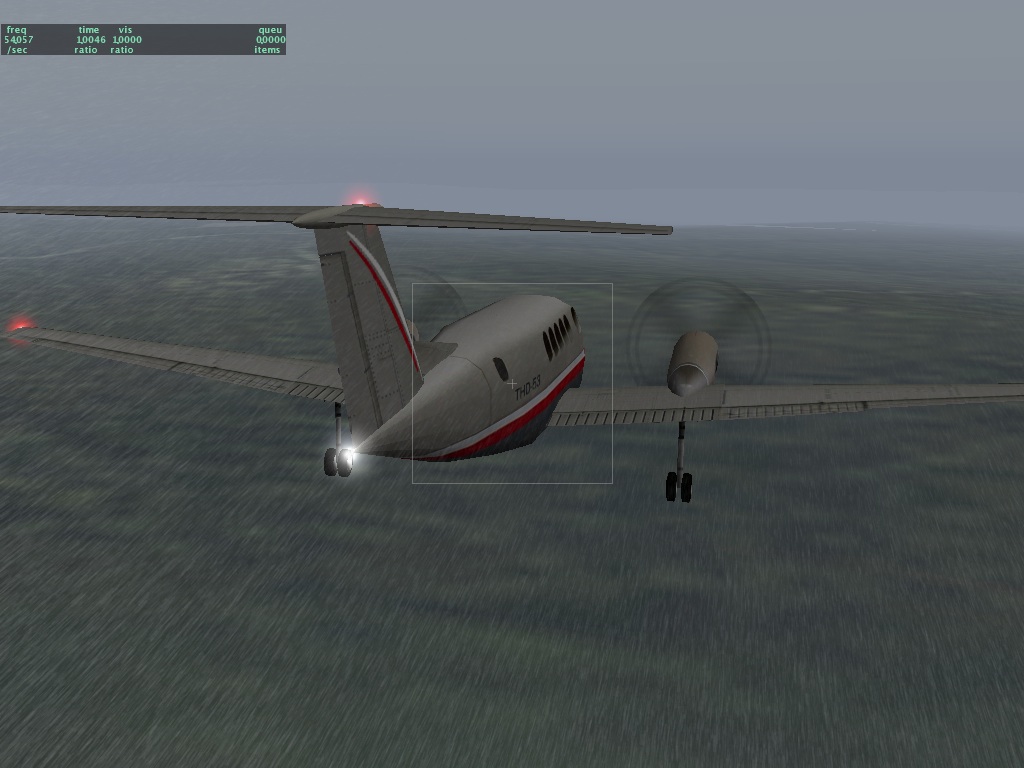
Perhaps we can call the new rain effect (due out in the next RC) “MegaRain XT” or, um, “HyperSpash GT” or “Virtual Droplet Technology (VDT)”? I don’t think I’m cut out for a career in product marketing. Anyway, here are a few screenshots:
There will probably still be some camera angles where the rain looks weird; it’s a compromise between image fidelity and framerate.
Apropos of nothing: Ami sent me this flash video. I must warn you…Chris described it as “the corniest flash I’ve ever seen”….and in the world of flash that truly says a lot. Think of it as the blue pill for your, um…bits. Anyone wanna make a flash video showing the virtues of MegaMoister 2.0? 😉
(I promise the next blog entry will contain more information and less attitude!)
This blog entry describes how to file a performance bug for X-Plane. You don’t have to participate in X-Plane betas, so if this procedure seems scary or too complex, I suggest simply waiting for the final sim release. But if you want to help, this procedure explains how to do it. It is not enough to just tell us “the framerate is bad now” – we will just ask for the information that this post explains how to provide.
First, to file a performance bug, you will need two clean copies of X-Plane: the current beta and the previous final release. Use the web-based installers to install clean copies of both of them. (Hint: you can download the current final release, then copy the folder and run the beta installer on the copy to save download time.) We always need a relative comparison of framerate between two versions to isolate how efficient the sim is from how fast your hardware is. If the sim is slow on your computer and has always been that way, that’s not really a problem with the sim. But if the sim used to be blazingly fast and now it is not, we can fix that.
In order to get a clean test we need to control every aspect of the simulator. Fortunately these clean installs have default preferences. But you will need to go through and make sure you have:
The same weather settings!
The same rendering settings. Make sure new features are off, e.g. if you are comparing 840 and 850, disable birds in 850.
The same aircraft.
The same number of AI aircraft.
The same location.
The camera facing in the exact same position and direction!
The same view mode (e.g. forward, forward with panel, etc.).
For your framerate test you will basically run the sim in a fixed configuration and take some screenshots.
It is very important that the camera angle be fixed. Use the “takeoff” menu item to place the plane on a runway. Do not taxi the plane into position; even the slightest change in the positioning of the camera can have a large impact on framerate, so if there can be human error in moving the camera, then the comparison is not valid. By pre-placing the plane you can get the same camera angle every time.
Some important notes on screenshots:
Control-period will take a screenshot in any screen, so you can take a screenshot of your weather settings, not just the sim screen. Always use control-period, not the built-in OS screenshot mechanism.
Please send us the original PNG files in a big zip file; please do not crop, editor or compress them!
Please do not run the sim at larger than 1024×1024 as the screenshots will be clipped.
For both 850 and 840 we will need three screenshots (so for each performance report we will need six screenshots):
A screenshot of the sim running. Use the data outputs screen to view frame rate, plane latitude, longitude and altitude, and camera location on-screen, so that these are captured in the screenshot.
A screenshot of your rendering settings.
A screenshot of your weather settings.
These last two allow us to exactly copy what you have configured. Please do not use “real weather” when you do these tests.
For each performance report, please send us the six screenshots, the log.txt after quitting both versions of the sim (so two log.txt files) and please tell us in the email the framerates of each sim both when paused and unpaused. (Take the screenshot when unpaused.) So there will be four fps numbers to report for every given test.
Note that these clean installs will not have any third party add-ons; if your performance problem is only visible with a third party add-on, please:
First do the performance test without them and file that pair of datapoints.
Then install the add-on on both and make as few configuration changes as possible and then file that data too.
So for a third party bug there might be eight fps to report – all combinations of: old and new, paused and unpaused, clean and with the add-on.