There are costs to every feature we put in X-Plane…the obvious ones include:
- The time to code the feature.
- The time to test the feature.
- The time to recode the feature if we ever rewrite the rendering engine (which we do fairly often to try to take advantage of the latest graphics technology).
There are also some less obvious costs:
- If a feature isn’t used often, it’s more likely to end up broken without anyone noticing, reducing the overall quality of X-Plane.
- We have to keep track of our use of graphics card resources. If we add a feature (like lighting) now, perhaps this will prevent us from reliably putting a new more improtant feature in later because some scenery may be using all of the card’s resources.
For example, what if we discover that we can make crashing waves, but only on unlit beaches? If we never added lit beaches, we know this is safe. But if we do support it beaches, then perhaps there is some scenery out there for which the crashing waves won’t work because we can’t have both.
The moral of the story: laziness is good! Since every feature costs, there is sometimes an advantage to waiting until someone asks for a feature before coding it.
You may have noticed: all of the “artwork types” (objects, terrain, roads, beaches, etc.) now do textures in almost the same way – with a TEXTURE command and a TEXTURE_LIT command. (Two notable exceptions: beaches and forests can’t be lit yet. We haven’t found a case where this is a goood idea but it may happen…nuclear accident anyone?)
The idea here is to unify aspects of all art files so that when future extensions come along, they can be used everywhere. For example, some day we will have textures whose choice is controlled by datarefs. When this happens, because every art file uses a similar mechanism to find textures, we can introduce commands not only in the terrain, but also in objects, facades, roads, etc. so that any type of art can be made seasonal.
This got me thinking about whether all aspects of every artwork type should be available in every file. I think the answer is…sometimes. For example, being able to use lit textures
everywhere is a good thing. But should it be legal to make hard polygons out of every art type? Definitely not every type. Terrain’s “hardness” for example is decided inside the DSF, so the only question is “how bumpy should the ground be when it is hard”. Objects let you control these things per polygon. But if we have hardness for a facade, how would we specify hardness? Perhaps just whether the roof is hard or not…
I think that X-Plane 8.50 will have more overlap in capabilities between the various types of 3-d “stuff” (beaches, objects, roads, etc.) but we still won’t have 100% of all features in every file type. Some combinations just don’t make sense.
Two, actually…we’ll see if these behaviors show up in beta…
 This is runway 4L at KBOS, from Google Maps. Note that a taxiway travels behind runway 4L on top of the blastpad.
Now compare how these look in X-plane 840 and X-Plane 850..
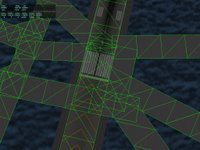 In X-Plane 840, the blast pad goes over the taxiways. This is fixed for 850. However you can see that the author may have been expecting this effect – there’s a lot of taxiway pavement put down around this junction. The new apt.dat format will alleviate this to some extent by allowing pavement to be shaped in arbitrary polygons, making overlapping no longer necessary.
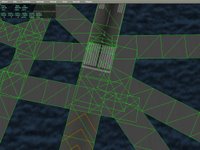 A more subtle shift: note that the threshhold is not in the same place in 840 and 850. This is because in 840 the blastpad (like most of the runway) is built in square tiles. Since the runway is 150 feet wide, the blastpad is rounded to a mulitple of 150 feet long. In 850, the blast pad is chopped at the exact point, so the threshhold can be where it is supposed to be.
The 850 airport RFC is on the scenery site now. It may seem very vague at this point – this is intentional; the next step will be to go through the file format and make sure we have all of the features people want: the right colored lights, the right types of pavement.
So if we’re not doing that yet, what is the point of the RFC? Well, we’ve been debating “next-generation” airports (meaning a system that provides something more flexible than a set of overlapped quad-polygons) for years now, trying to weigh the alternatives. Here’s a summary of how the new scheme compares as an approach:
- The new apt.dat is a “low-level” approach. The old apt.dat format didn’t allow us to analyze the taxiway layouts to determine what represented a single taxiway – it was just concrete that we hoped looked right based on user design. The new format continues this; we give you the flexibility to make almost anything and hope you pick something good.
- Non-runway pavement is changing to bezier-curve-based polygons, for a lot of control and flexibility over the look of the layout. One advantage of bezier curves is that the sim can render the curves using more triangles on faster systems (for a nicer look) and fewer triangles on a slower system (for better framerate).
- Runway lines and markings are relatively independent of the pavement. While they can be embedded on the edge of pavement, they can also be placed anywhere you want.
Here are some things you won’t find:
- There won’t be a lot of new objects – those belong in overlay DSFs.
- There aren’t “ATC” features (e.g. names of taxiways, paths for AI planes to take) – those will be added when we’re ready to code them in the sim.
- There’s almost nothing automatic. X-Plane doesn’t analyze the apt.dat file and place signs, lines, lights, etc.
To elaborate on this last point: image for example that we’re going to spend the time to code an algorithm that generates taxiway lines that go from a parking spot to a taxiway. We could put this algorithm in WED or in the sim. If we put it in WED you can run the algorithm and then fine tune the results if you don’t like it. If we put it in the sim, then you’re stuck with the results untuned, and the algorithm has to run while you’re flying.
So in this sense the 850 apt.dat continues the direction DSF took of making a flexible low level format that leaves the ultimate decision of how the scenery looks in the hands of the author (by editing the file) rather than in the hands of the sim.
 This picture shows explicit layering control for objects, a proposed extension for X-Plane 850. In this case the blue square, red square, and yellow cube are three separate objects, all sharing a texture. The blue and red objects use polygon-offset (ATTR_poly_os) to avoid flicker. The blue and red objects also contain an experimental layer controll attribute (ATTR_layer_group. The red object has a layer number lower than airports, putting it under the runways, while the blue object contains a layer number higher than airports but lower than 3-d objects, guaranteeing that the yellow cube goes over it and not vice versa. Without these the load order would be random and every object would be on top of the runways.
The performance of the new X-Plane 8.50 lights using pixel shaders is looking good. However, old scenery that uses a lot of lights won’t benefit.
The problem is that the old lights were subject to ATTR_LOD limitations. Outside the last LOD the lights disappear; authors usually do some creative things with the LOD of the object to make the lights appear at the right distances.
But the new lights are drawn independently of the object LOD. This is good – it means that a low-LOD object (good for framerate) can still produce a light visible a long way away.
The problem is – these two things are not compatible. So we don’t use the new light technology for existing OBJ lights.
If you want to use the new lights in your scenery and you have a “point lights object” all you have to do is convert the object to OBJ8 format (if it isn’t already) and then substitute the old light commands for the new ones. If you have two LODs you may want to delete one, as it’s no longer necessary. Change the OBJs and leave the ENV or DSF alone and you should see a performance increase on hardware with pixel-shaders.
(Yes, you can use OBJ8s with ENVs. I don’t recommend it, but when X-Plane finds a custom object in an ENV it will read it no matter what version – 2, 700 or 800. So if you have a custom ENV package with orthophotos and point lights you can convert them.)
I’ve been asked by a few object authors to put a show/hide command in the OBJ8 format for more advanced animation. It turns out this is trickier than you might think. For example, consider this set of OBJ8 commands (based on a hypothetical ANIM_hide command):
ATTR_flat
TRIS 0 30
ANIM_begin
 ANIM_hide sim/flightmodel/whatever
 ANIM_smooth
 TRIS 30 30
ANIM_end
TRIS 60 30
What’s tricky here is: the use of state changes inside the “hidden” part of the object. Should the triangles after the animation be smooth, flat, or change depending on the animation?
Internally X-Plane has an object optimizer; when objects are loaded we analyze it and attempt to reduce the number of total commands, so that object drawing is as fast as possible. I strongly recommend you optimize your objects heavily – if we optimize, we might make the object faster, but if you optimize you will make it faster. Our optimizer is aimed at speeding up internal commands that are generated by X-Plane as it translates the object from OBJ7 or OBJ8 to our internal memory structure.
The problem with using show/hide to optionally skip commands is that the optimizer can no longer remove state changes. Because we don’t know whether we’re flat or smooth (after a hide command) we can’t know whether the next flat or smooth attribute is needed or unnecessary. So if show/hide is truly conditional (meaning it can skip commands) then it actually can cause things to be slower because it prevents X-Plane from removing unnecessary state change.
(The case of smooth/flat might seem trivial and contrived; it is. But there are additional “hidden” attributes that are generated by X-Plane as it translates the OBJ into our in-memory internal format. So state change can come from places you might not expect. Thus it’s important that the optimizer do its best to remove state change that can’t be addressed in the OBJ itself.)
The alternative (and one that is more likely to get implemented) is show/hide as state. Under this model, the full object is completely evaluated, but the ANIM_hide command basically causes triangles to not appear. This is similar to the workaround that people are doing now: using ANIM_translate to move the unwanted geometry a very long way away (and hoping it is out of sight).
Show/hide as state makes a trade: all commands are executed always, so we run no faster by hiding, but since the execution of the object never changes its flow, it can be more heavily optimized.
I am currently leading toward the latter approach for this reason: currently objects are slow because the CPU must do the work of state change (ATTRibutes, etc.). But graphics cards are becoming more sophisticated; in the future it may be possible to run an object with state change as a single command for the graphics card, with no CPU intervention, making things faster. But the graphics card does not yet have the ability to handle conditional logic, so show/hide as conditional logic could stop us from fully utilizing the graphics card in the future.
(Some OpenGL geeks may be thinking now “but the latest graphics cards do have conditional logic”. This is true, but currently it is only usable in shaders; the cards do not yet have the ability to skip whole commands conditionally. I believe they will be able to handle static state change before they can handle conditional state change.)
Normally I try to avoid saying anything about future releases; I find that pre-announcing things just induces Murphy’s Law…something unexpected goes wrong, and people are disappointed when what we ship turns out to not be what we thought we shipped.
So at risk of getting myself into trouble, let me say this:
It is my goal to ship the first version of the graphical DSF overlay
editor concurrently with X-Plane 8.50.
That’s an aggressive goal, because X-Plane 8.50’s going to have a lot of features in it, so Austin and I are really busy right now. But hopefully by putting it out there, I can hold my own feet to the fire and get this important tool out to users!
A quick note on the AC3D plugin based on a conversation wtih Tom….
The AC3D X-Plane OBJ export plugin is not an optimizing plugin – it is meant for “finishing”.
The idea is that the plugin can edit an OBJ and preserve almost any strange sequence of attributes you come up with. If you’ve carefully ordered your polygons and used ATTR_no_blend and a bunch of other tricks to use translucency and other tricks, the plugin will not scramble your work, but will preserve it. This lets you put the finishing touches on your OBJ, hence a “finishing” plugin.
The other side of this is that in preserving your object, the plugin does not attempt to make any optimizations that would reorder your object. So if you “ask” the plugin to make an inefficient object by using lots of state changes, it will do so and your framerate will suffer.
Basicaslly there is a direct correspondence between the model in AC3D and the exporter OBJ file. So to use AC3D efficiently you must understand both what makes an OBJ fast (not using ATTRibutes among other things) and how you do these things in AC3D (not using flat shading at all, for example).
The best of both worlds would be of course to have a menu option to optimize a model, which would let you optionally change polygon order for speed. This is something I would like to do but I’m not sure when I’ll have time to code it.
850 is turning out similar to most feature-based X-Plane releases – like a tropical storm picking up speed features keep getting sucked in, creating more chaos in its core. I thought I would be working on airports and lighting only for 850, but there’s already a number of other things floating around in the release. The end result should be better visuals.
A quick note on usage of PNG: the formats of X-Plane and PNG images are not quite the same.
- To provide a non-alpha image in X-Plane, use an RGB or grayscale PNG.
- To provide an image with alpha in X-Plane, use an RGB or grayscale PNG with an alpha channel.
- To provide an alpha mask in X-Plane, use a grayscale PNG.
This last case is the strange one: as far as I can tell PNG does not allow an alpha-only image. So when X-Plane needs an alpha mask (a 1-channel image) it uses a grayscale (1-channel image).
Also please note tht you can use a color or grayscale PNG for a color texture, but internally X-Plane always operates in RGB, so you don’t save any VRAM by reducing your PNGs to grayscale. You might save some space on disk.


