(This post was edited to reflect a discussion Ben and I had)
A constant request for XPlane2Blender and other exporters maintained by Laminar Research is an import OBJ feature. So, one last time, here is the news: by now an importer is basically never going to be a part of XPlane2Blender, but it could be its own project! It could take years of development to make it very well polished, however.
There are a few projects started on the forums you can checkout if you’d like!
Why Is This Such A Hard Problem?
It is simple to read the vertex table, attributes, animation keyframe table, and turn that into Blender data, some projects can already do this, in fact. The trouble is getting the exact or nearly the exact .blend file back.
OBJs Don’t Save Everything You Want And Need As An Artist
Some of the things things you could never import from an OBJ
Window Settings
Text Blocks with scripts, notes, or annotations
Any non-XPlane2Blender Blender settings we don’t care about
Object, layer, material, and texture names
A bunch of settings that can’t easily be inferred (more on that later)
Blender’s parent child relationships
If the OBJ was produced with comments and correct indentation, you might be able to get some of these things back (likely just a few names.) A large complex Blend file without this stuff is a nightmare of an unorganized mess and would make the rest of the manual reverse engineering process even harder.
Multiple .blend files Can Produce The Same OBJ Content
If A.blend, B.blend, and C.blend can produce the same OBJ, which one should the OBJ be reversed engineered back into? The relationship between XPlane2Blender settings and what appears in the OBJ can be very esoteric and there is not always a 1:1 relationship. Some ATTR_s only appear when certain combinations of settings are used. You may find there are absolutely no good defaults.
A Moderately Smart Importer Would Need To Know Massive Amounts of History Of All Exporters
In order to perfectly solve these ambiguities and produce .blend files that are similar to what originally exporter the OBJ file, it would be incredibly useful to know about the behavior of the exporter that exported the OBJ in question. This means an importer would need to know all the bugs and features of every exporter, and we don’t even know that after developing the exporter. Bugs are waiting to be discovered, or used by artists until they have to be turned into a feature. Our exporter currently struggles to take into account past bugs, and that’s the exporter!
This turns into it’s own ambiguities to solve: “Is this OBJ’s mention of deprecated ATTR_s a choice the artist made. despite the deprecation warning, or was it a bug that this was still getting written, or was this OBJ written before it was deprecated?” Now you’re messing not only with valid or not, but what the OBJ is supposed to look like.
Optimizations Create Further Challenges
Exporters often take optimizations to improve an OBJ’s performance and quality. For instance:
Ignoring or appending ATTRs to handle deprecations or obsolete OBJ features
Now you will have even less information or, now, seemingly incorrect information! OBJs are meant for X-Plane, not humans. As such exporters can take many liberties with the content of OBJs as long as they match what the artist meant. This can result in very complex optimizations that might even break our own guidelines, all to deliver the best (and deliver on time) to the consumer and our artists. This makes developing an importer that reproduces the importer OBJ, either exactly or simply visually matching (let alone animated or textured properly) even harder.
In a raw .blend file, objects are like Lego bricks which get baked into one solid piece. Going in reverse will likely not get the same neat separation. Blender is not smart enough to tell what is a wing shape, what is a wheel shape, what is a throttle level shape. It may be impossible to separate the vertices back into these distinct meshes (especially after optimizations)! Making a “really smart” importer that is shape aware is a brutally hard algorithm that the world’s best computer scientists are still attempting to solve. It may not be challenge you want to take on.
We May Build A Reasonable Importer One Day!
With all these challenges, an importer would have to be willing to not handle all edge cases and not attempt to reverse engineer an OBJ back to the exact .blend file that made it. For instance, a 3 year old OBJ would not be reversed engineered into the .blend file that produced it 3 years ago, especially since an artist would want to then update their assets anyway! Having art assets “marooned” on other exporters or “dead” is a pretty terrible waste of time, likely be more painful than hand fixing all lot of little things. As Ben pointed out “If we can’t make a direct import [.skp->.blend, .ac->.blend] path, OBJ import is the least bad option.
2.49 to 2.7x Converter
A 2.49 converter is a much more manageable project (far on the back-burner.) The complexity of this tool is much more manageable, because the 2.49 is not in active development and you are converting .blend to .blend, not .obj to .blend. Blender to Blender is something which Blender is already very good at.
For airplane authors, the biggest question VR brings up is: what do I have to do to my aircraft to make this work? This is the first of three posts explaining not only how manipulation works with VR, but why we made our decisions and how we got here. Bear with me – this will end with specific recommendations for what to do with your aircraft.
A Long Time Ago…
Old-timers like me will remember that when the 3-d cockpit first came out, almost all of the “brains” of it were powered by clicking on the 2-d panel, which was “mapped” to the 3-d cockpit. X-Plane would find out where your mouse click intersected the 3-d cockpit, find the texture location on that triangle, and map that back to the 2-d panel.
This seemed pretty cool when it came out 15 years ago, but as authors started making more sophisticated 3-d cockpits, it became clear that we needed a way to specify how the mouse worked directly with the 3-d cockpit shape, because the mapping back to the 2-d wouldn’t allow the user to do basic things like dragging a throttle.
Thus in X-Plane 9 we added the first set of manipulators – tags on the 3-d mesh of a cockpit specifying what happens when the user clicks on it. The manipulator could specify a dataref to modify, a command to actuate, and some data about what kind of mouse click operation was happening.
The key words here are mouse click. The original manipulators were designed entirely in terms of a mouse on a 2-d screen; they were designed to be exactly as powerful as a 2-d panel system, which was of coarse also totally mouse-centric. The relationship between the generic instruments and the original manipulators is pretty tight.
Moving to Mechanisms
The good part of the original manipulator system was that it was very flexible – mouse-centric handlers were a low level tool around which authors could do whatever they wanted.
The down-side of this design was that mouse-centric handlers were a low level tool around which authors could do whatever we want. We examined our own default fleet of a dozen or so aircraft and found that no two aircraft’s cockpits operated the same way, and almost all of them had at least some aspect that was hard to use – a poor manipulator choice for the job.
Knobs were, in particular, quite difficult – the original 2-d panel system used click-and-hold over a knob to actuate it, but authors working in 3-d had often used drag actions to do knobs, and the drag actions would respond differently depending on camera angle. We received approximately 8,452,124 bug reports that the knobs in the 747 were hard to use specifically because of this.
So during X-Plane 10, we added some new manipulators to X-Plane, and they had a very different philosophy: the manipulator described what was happening in the simulated aircraft, and X-Plane picked a mouse behavior to make that work. The new manipulators described knobs that turned and switches that either flipped left-right or up-down. These manipulators reacted to the scroll wheel automatically because X-Plane knows what the knob is and therefore what a reasonable scroll-wheel interaction should be. (By comparison, with the old-style manipulators, the author has to specify what a reasonable scroll-wheel action is.)
Real Interaction Things Before It Was Cool
As it turns out, mechanism-centric manipulators are a lot better for VR than mouse-centric ones. Consider two cases:
The 2-d axis manipulator (ATTR_manip_drag_xy) specifies what happens when the mouse moves up-down and left-right, relative to the screen. What on earth does that mean in VR? Even if we made something that tracks up-down and left-right relative to the screens of the HMD, the results would be completely weird because the “thing” in the cockpit would not move the way your hand was moving. With a mouse, a mis-match between mouse and aircraft isn’t surprising, but in VR, it’s weird to reach out and touch something and have it behave the wrong way.
The knob manipulator. It describes a knob that does things when turned clockwise or counter-clockwise. This is pretty easy to deal with – you click it with your controller and turn your wrist clock-wise or counter-clockwise and it turns. Because we know what the mechanism is (and not just what the mouse should do) we can make a good decision about how to handle this manipulator in VR.
As it turns out, we ran into this problem of not doing what to do with the mouse, and needing to know what the mechanism was before we even started looking at VR. The exact same problem (“I want to touch the 3-d cockpit as if it was a thing and have it respond in the expected way”) exists in VR and on X-Plane Mobile!
Because X-Plane mobile runs on a touch screen and you have your physical finger on a switch, there are a lot of cases where the switch has to track really well and work the right way. If the switch goes up and down, you want to flick your finger up to turn the switch on; if it goes left-right you want to flick left and right, and anything else is astonishing.
So X-Plane mobile set us on this path toward mechanism-based manipulators, and VR further drove us in that direction, since both have the same physical, non-mouse environment where a user directly interacts with the 3-d cockpit.
Guidance For Authors
So as an author, what should you do when working on a 3-d cockpit? My answer is: use some of the manipulators, but not others, to model the way things work in 3-d.
Use these manipulators ALWAYS
These manipulators are the best way to create certain physical mechanisms – use them every time this case applies to your aircraft.
ATTR_manip_drag_axis. Use this for a physical mechanism that slides along a linear path, like the throttle handle of a Cessna.
ATTR_manip_drag_rotate. Use this for a physical mechanism that rotates around a fixed point, like the throttle handles of a 737, or a trim wheel. (Prefer this to the old technique of putting a drag axis along the edge of the throttle handles.)
ATTR_manip_noop. Use this to make a manipulator that blocks the mechanism behind it from being touched, e.g. the safety guard plate over a switch.
ATTR_manip_command. Use this for push buttons that actuate momentarily while a button is held down, like a button to motor a starter that you push in and hold down.
ATTR_manip_command_knob, ATTR_manip_command_switch_up_down, ATTR_manip_command_switch_left_right. Use these for knobs and switches with 3 or more positions that rotate or move. Pick the right manipulator for the mechanism!
ATTR_manip_axis_knob, ATTR_manip_axis_switch_up_down, ATTR_manip_axis_switch_left_right. These provide an alternative to the above manipulators when you must use a dataref. We recommend commands over datarefs any time you have a choice; the command system provides better interoperability between custom plugins, custom aircraft, and custom hardware.
ATTR_manip_command_switch_left_right2, ATTR_manip_command_switch_up_down2, ATTR_manip_command_knob2. Use these for knobs and switches with exactly two positions. You can use these to get a simple click-to-toggle with the mouse (quicker and easier for mouse users) while getting real 3-d movement in VR.
Use These Manipulators Sometimes
These manipulators are not perfect fits with physical motions and may require tweaking for VR, but they’re the best options we have now for certain problems. Try to use something from the always list instead if you can. Do not use these manipulators if the mechanism you are simulating matches something from the list above.
ATTR_manip_drag_xy. This is the only 2-axis drag we have, and is the best choice for eye-ball vents and the yoke. The yoke is special-cased in VR and should be based off of a 2-d xy manipulator. We are looking into more powerful multi-dimensional manipulation in VR, but this work won’t be complete for 10.20.
ATTR_manip_command_axis. This manipulator runs a command once based on moving a lever down or up. You should probably use a drag axis or command up-down switch, but there may be some odd mechanisms in aircraft where this manipulator is a good fit. It should not be your first-choice go-to manipulator.
ATTR_manip_push, ATTR_manip_radio, ATTR_manip_toggle. These manipulators can serve as alternatives for push-button style controls when you absolutely have to write to a dataref and not use a command. WARNING: Do not ever use these manipulators for things that move, e.g. don’t use these for banana switches, spinning knobs, or things like that.
Do not use these manipulators
These manipulators were for mouse-centric movement and should be replaced with knob or switch manipulators.
ATTR_manip_delta, ATTR_manip_wrap. These were designed to simulate knobs by click-and-hold – use the knob manipulators instead.
ATTR_manip_drag_axis_pix. This was designed to simulate a knob by click-and-drag – use the knob manipulators instead.
We Love Commands
As you may have noticed from this list and the ever-growing size of X-Plane’s built-in command list, we love commands – they have become our go-to mechanism for our aircraft. Commands have a few advantages over data-refs:
There is a clear design in the plugin system for changing a command’s behavior. So a third party aircraft can easily “take over” the existing engine start command. This is very, very difficult to accomplish via datarefs.
Commands can be mapped directly to joystick and keyboard hardware. There is no way to bind a joystick to a dataref.*
Commands can be mapped to sound to capture the act of the user “doing” the thing, regardless of whether it works. For example, if you want the click of the starter switch regardless of whether the starter motor engages (maybe the battery is dead), commands make this easy to do. Often there is no dataref for ‘the user is trying but it’s not working’.
In X-Plane 11 we’ve been moving to commands to get our planes ready for VR, the new manipulators, and FMOD sound all at once.
In the next post I’ll cover some of the issues specific to VR and the 3-d cockpit.
* Developers who write plugins that provide external interfaces to X-Plane: make sure you have a way to provide access to commands and not just datarefs! There are things you can do only with commands and not datarefs.
This release encompasses all of the beta. You can read through the beta notes for more details, but, here are the highlights:
New Features
Single button to “Export OBJs”, skipping the file selection box
Autocorrecting spot lights – the light points where you point it, not where the parameters tell it to go!
X-Plane 11 support for Blend Glass, Normal Metalness
New clean UI, better laid out, more consistent look, and some properties smartly hide when they’re invalid or not relevant
Support of 1 LOD box
Enhanced build number and plugin history to help debug files and track update problems. After installing this rc.1 version, your scene settings should look like this. The green check mark means “most safe” to use.
No more reading the lights.txt file. The list of lights and their parameters can now be found online
Though unsupported and largely irrelevant to most authors, a “Plugin Development” section has been added with some neat tools that you probably shouldn’t use.
EXPORT directive (really only useful for LR toolchains. Documented here for posterity’s sake)
Important bugs
Animations have been optimized
Bones, nested bones, and complex parent-child relationships with armatures now work better,
Animation types have been synthesized to just Transform, Show, and Hide instead of Loc, Rot, LocRot, Show, Hide
We could not have gotten this far without the incredible support of our beta testers, new authors, bug reporters, and all the wonderful artists who give us the inspiration and energy to make this product better! It has been an incredible journey diving into this facet of the community and I look forward to even more releases, including VR manipulators, full WYSIWYG lights, and more!
I hate finding out about these kinds of bugs late in the beta. But this one was pretty big.
X-Plane uses a “metalness” material model. Metalness is a fairly standard material model that recycles the albedo of your material to implement both dialectrics (non-metals) and metals. It works like this:
Non-metal: diffuse light is tinted by the albedo texture. Specular light is not tinted.
Metal: there is never diffuse light. Specular light is tinted by the albedo texture.
In other words, since metals don’t have a diffuse component, we recycle the albedo to save texture space.
The bug in 11.05 is that for a pure metal, the albedo was tinting ambient light but not the sun itself. A third party developer sent me a test model that showed the problem – here’s the before and after.
11.05 – sun spot is white.
11.10 – sun spot is red.
That weird set of colors on the top of the helicopter body is due to the white sunlight being added to the red body. The red aircraft body is lit by ambient light reflected directly off of the environment. The runway stripes are not visible because the metal is about 30% rough, diffusing the reflection.
(One of the confusing things about PBR models if you are not used to them is that the environment itself can cast both diffuse light and specular reflections off of a material, and if the material is rough, it can be hard to tell them apart. Diffuse light is always widely diffused, no matter how glossy the surface.)
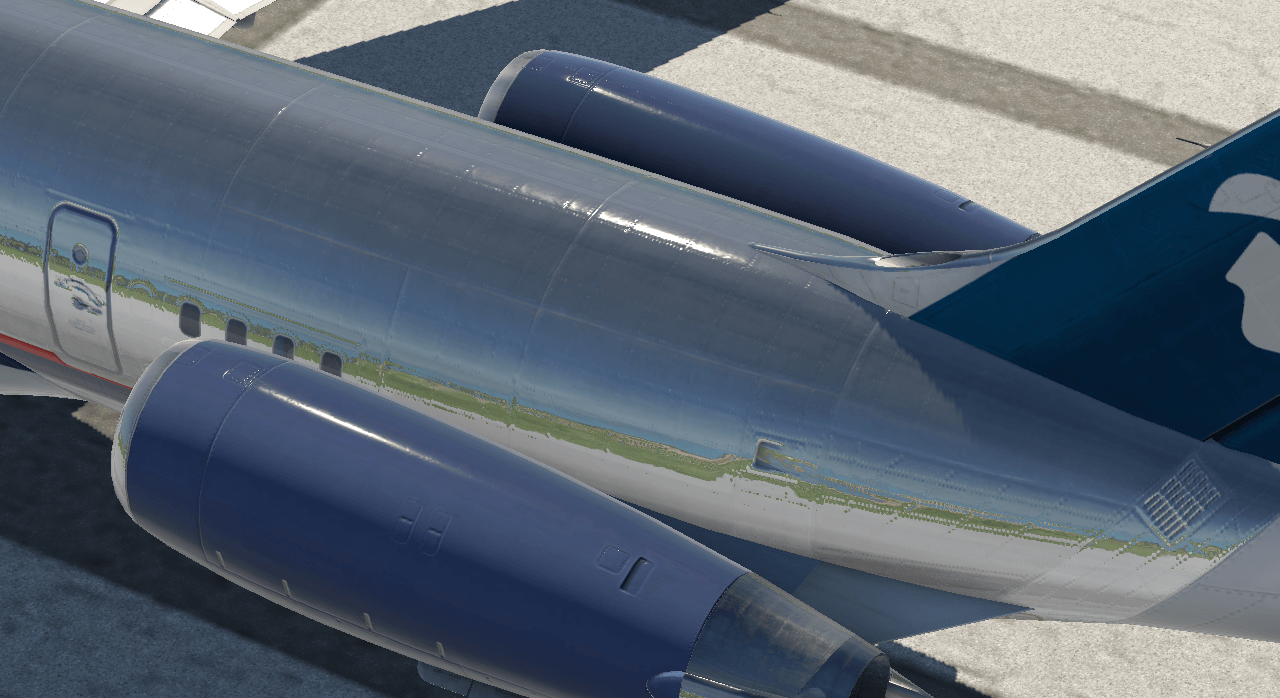
Alex and I took a look at some of our legacy aircraft and found that fixing the lighting didn’t make too much of a difference for metals that are not tinted.
MD-80 11.05
MD-80 11.10
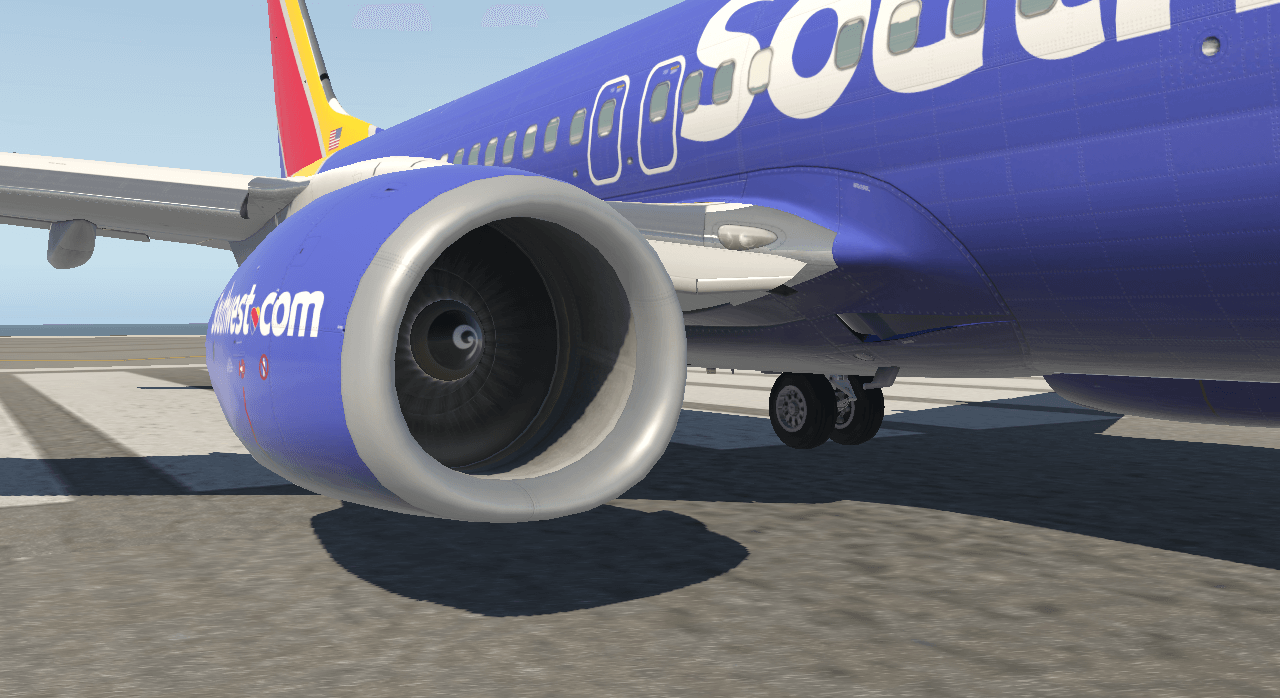
737 Engine 11.05
737 Engine 11.10
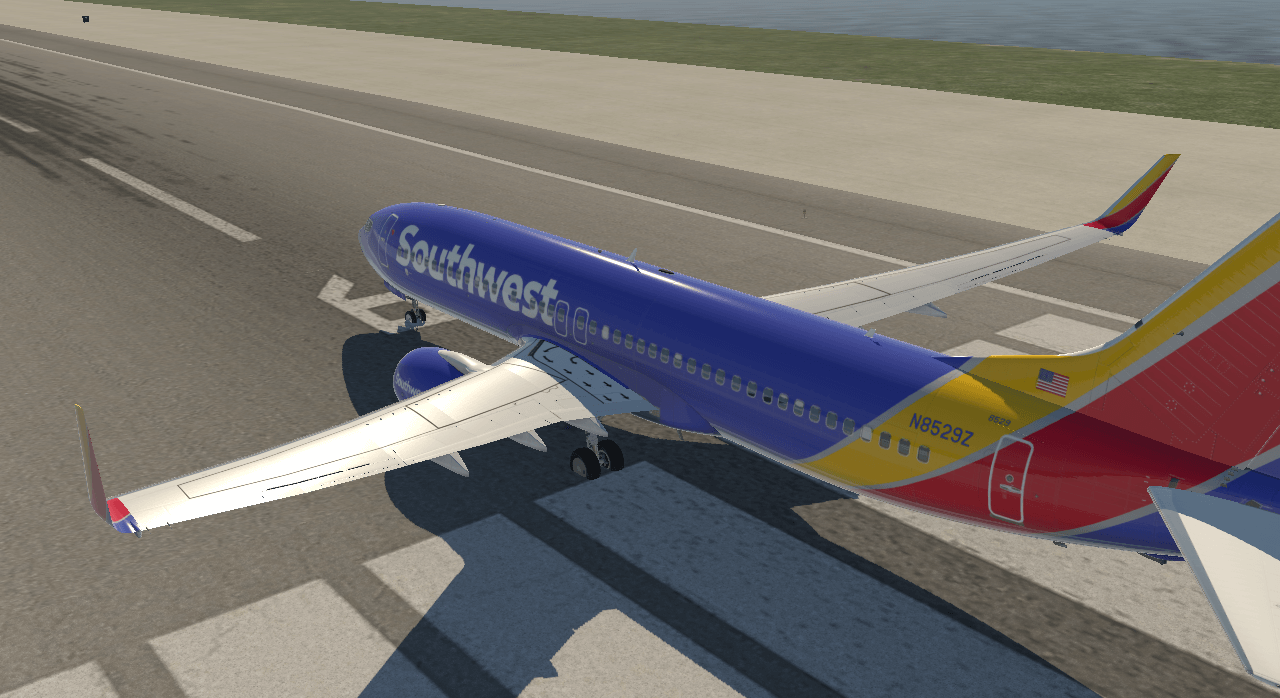
737 11.05
737 11.10
Since our aircraft don’t have any “tinted” metal there isn’t much change. Note that in real life heavily tinted metals aren’t common. The cases you might have are:
Approximations of metals with complex spectrum-dependent fresnel like gold.
Composite paint, e.g. like for your car, with fleks of metal and translucent dielectric polymer mixed together – that’s the case where this really helps.
As I wrote this up I realized that the spot lights are still wrong in beta 8 – they’ll be fixed for RC1 unless people really need the old model, in which case we’ll have to put some versioning in. My guess though is that anyone doing composite paint realized it was impossible in 11.05 and hasn’t shipped anything like that yet.
Plastic on top, metal on bottom, 11.05
Plastic on top, metal on bottom, 11.10
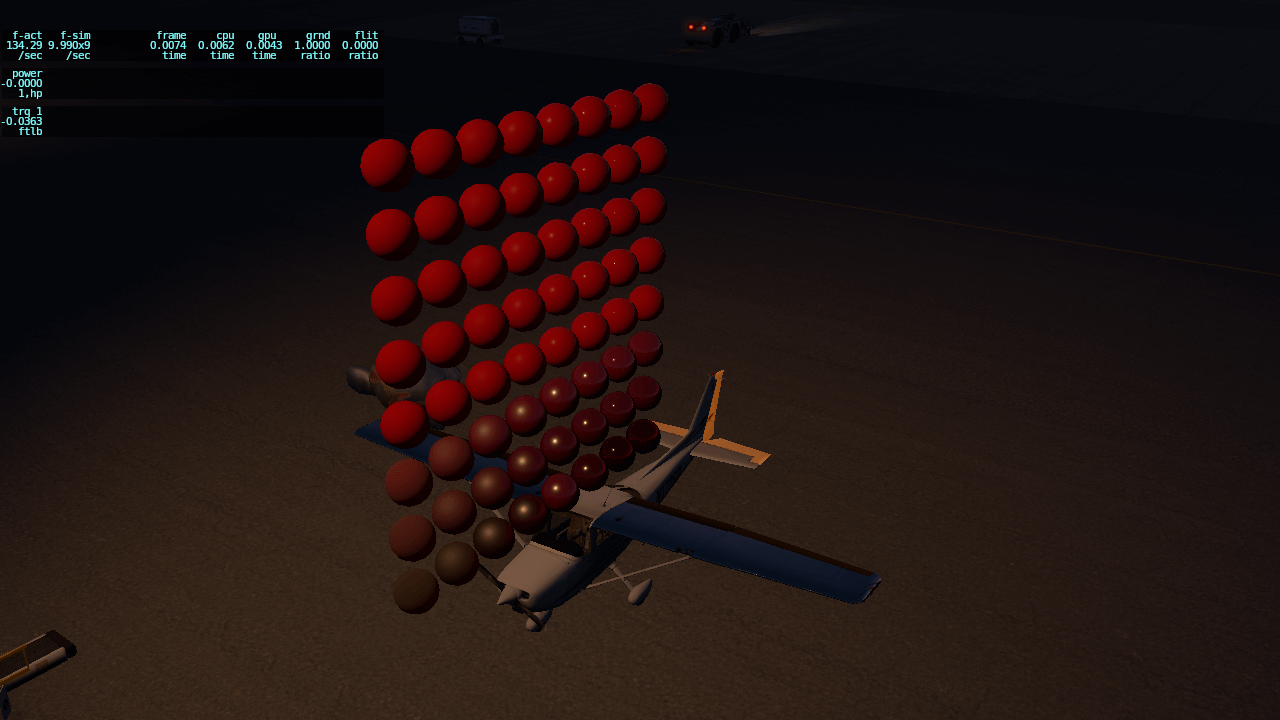
Red material, varying metalness and glossiness, 11.05
Red material, varying metalness and glossiness, 11.10
In these comparisons we are under an airport light viewing various materials. In the multi-color case the bottom row of materials are various “metals” with light tinting to simulate copper, iron, gold, etc.
In the second set of cases (all red) we have a 2-d grid: metal on the bottom, dialectric on top and rough on the left and glossy on the irght. Note that the reflection of the overhead light is reddish for the metals and white for the plastics in 11.10 (correct) but all white in 11.05 (incorrect).
One big massive bug fix! (and some optimizations!)
#264 caused some people’s lights to be put in the wrong place. The fix involved Ben coming up with awesome math to put things back in their place by a certain offset, and then us creating a way to parse the light.txt file that controls much of the lighting in X-Plane.
This Changes Nothing in Your Blend files!
Seriously! No Blender data should change!
However, It Could Change Your OBJs
XPlane2Blender is now more consistently WYSIWYG! Meaning that if you point a spotlight at a wall, it should show up pointing in that direction, regardless of what a named spill light thinks or the parameters of a param light think.
This is good news for new authors and authors suffering from the bug, but depending on how you’ve been making your lights appear rotated, it could result in needing to change the rotation or parentage of existing lights.
What Lights Are Affected?
All of the following conditions must be true for a light to be affected by this change
Be a Blender non-point light, for instance a spot light
The light’s XPlane Type must be Named or Param
The light’s XPlane Name must be found in the lights.txt file inside the addon’s new resource folder
In rare edge cases, special and less used lights will be excluded from auto correction.
So, as you can see its either somewhat common or very specific which lights are affected. So, if your eyes haven’t glazed over yet,
Please Send Reports Of How This Affects You – Good, Neutral, Or Bad!
We try our best for backwards compatibility and a bug free existence, but we don’t know everyone and their situation until they say hi! If you are faced with large hurdles to continued productivity, please file a bug! Preferably with before and after pictures and .blend files. Automated fixes may be developed for people affected.
This is just one step to a more WYSIWYG XPlane2Blender.
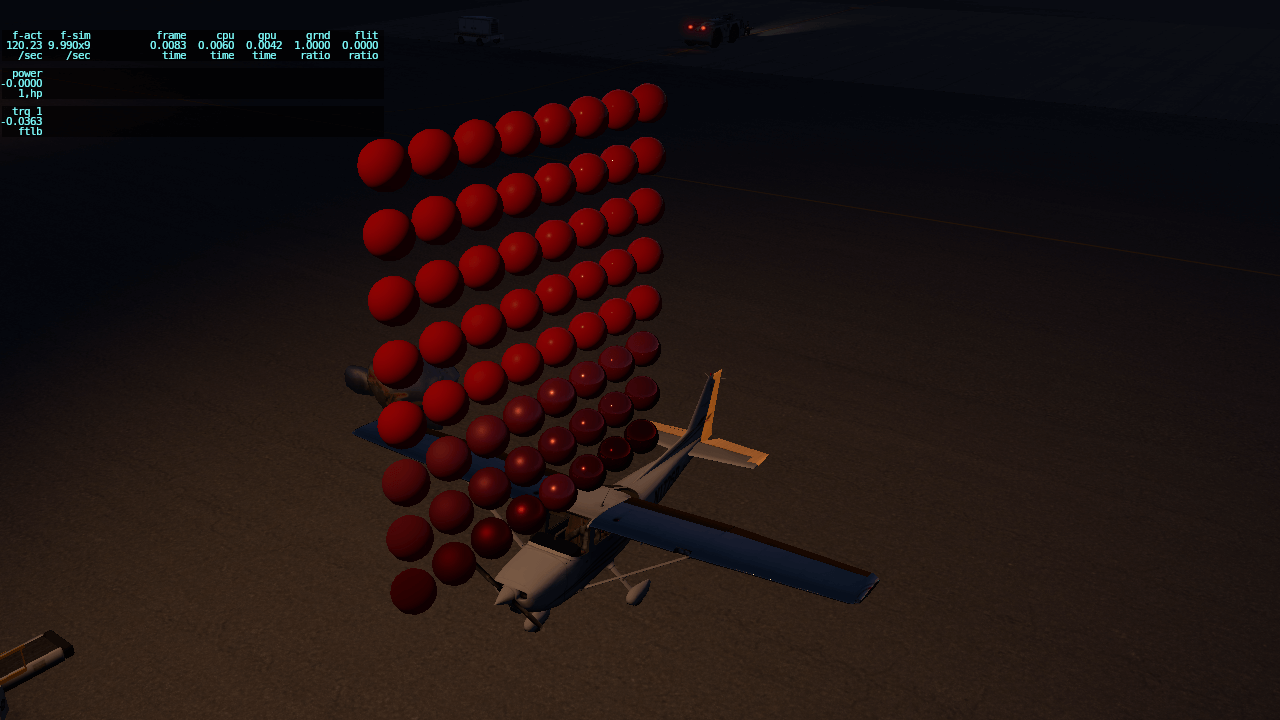
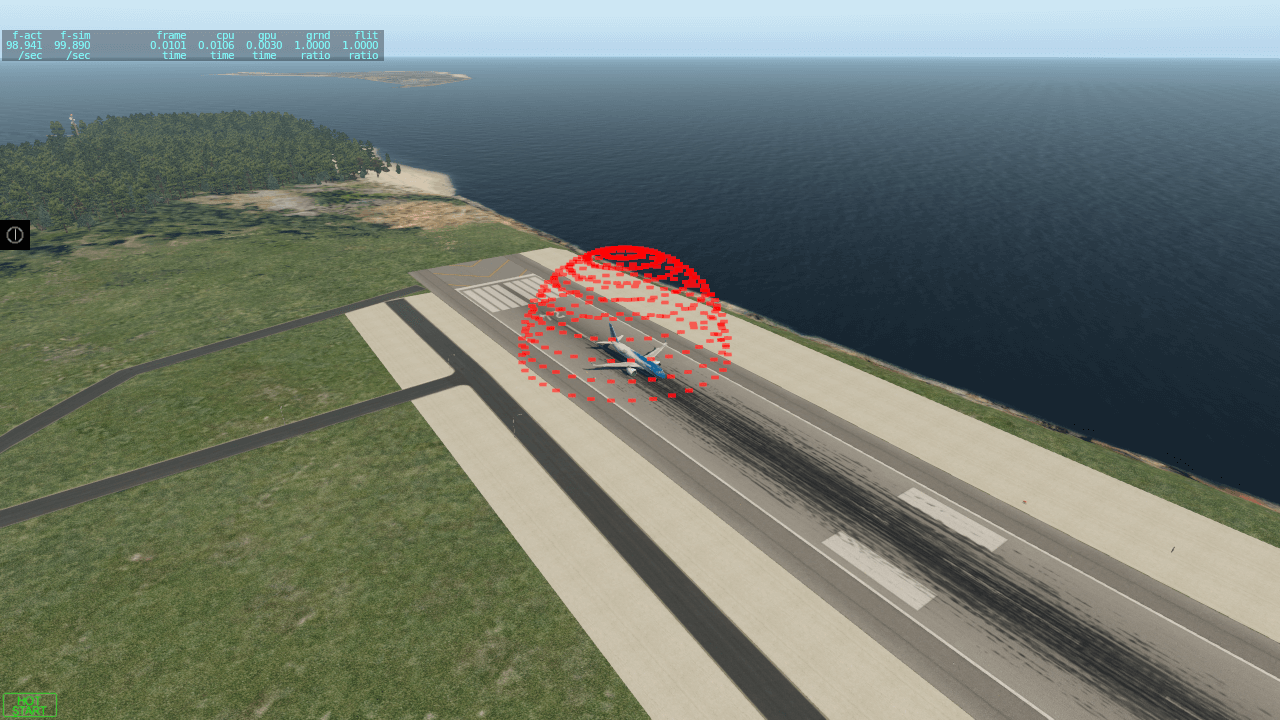
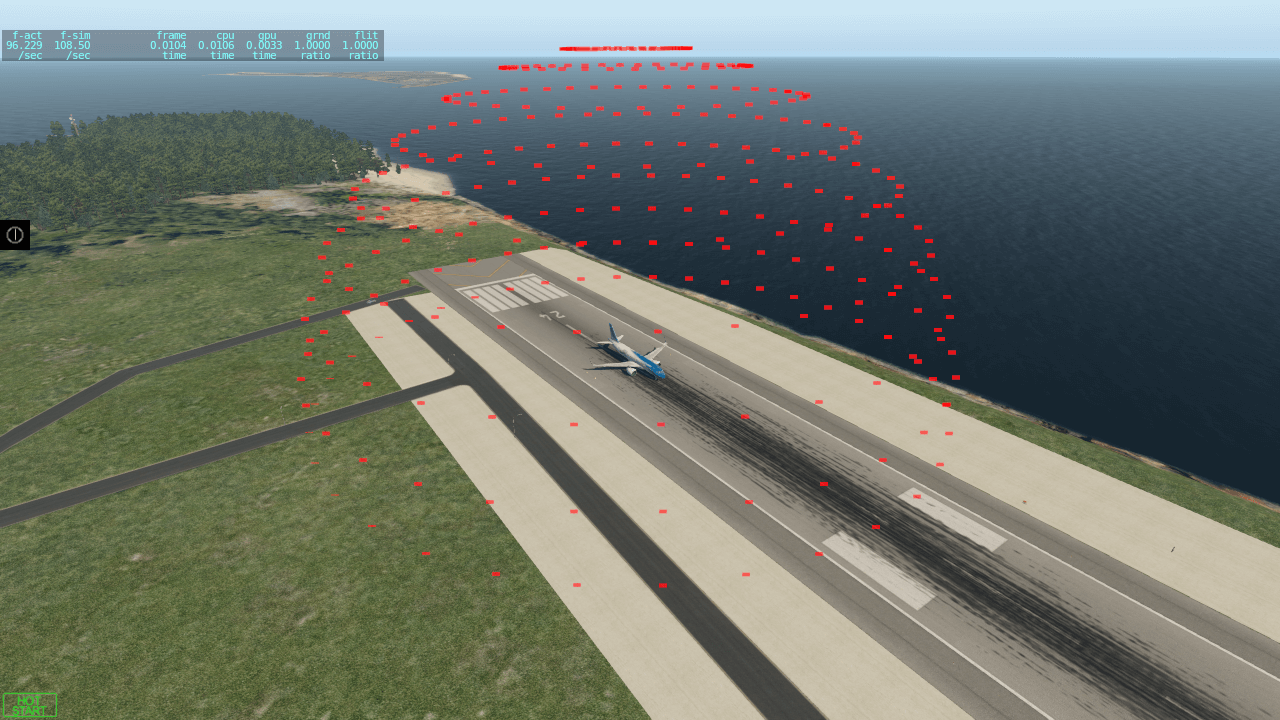
With 11.10 there is a new way aircraft only shadows are done, as well as how aircraft icons are generated. The big change is how we calculate the volume of the aircraft which up until now was based on all OBJ files that the aircraft ships with, including things like ground- and fuel trucks, stairs etc. The reason this is undesirable is because the greater the volume of the aircraft, the worse its realtime shadow quality will be because we use the volume of the aircraft to calculate our shadow map area. The bigger that area, the worse the shadow quality and the more pixelated it will look like. In an ideal world, the aircraft volume tightly hugs around the actual aircraft and we get the best shadow quality possible. With 11.10, hopefully this ideal world is finally here!
Why and how we failed before
Before 11.10 the aircraft volume was based on the volume of, well, the aircraft. However, this includes things such as the aforementioned ground trucks, fuel trucks and what have you, that artificially blow up the volume calculation. The problem is, all these objects are technically part of the aircraft (eg. we move them around with the aircraft), but they are for the most part invisible and most people wouldn’t actually consider them to be part of the aircraft proper.
In 11.05 we added a change to also consider the physical volume which kind of has the right size for the plane but doesn’t include OBJs. It is based on the physical size of the plane only, which sounds like it’s the right thing. However, as it turns out, this volume breaks badly for things such as helicopters because the rotor of some third party helicopters are attached OBJs and won’t be considered part of the physical volume of the helicopter.
At this point I should probably also quickly note what happens if the shadow volume is too small: Everything that gets clipped by the shadow volume will cast a shadow into infinity and beyond due to the way the shadow mapping works. This is especially bad for the helicopters that now have very quickly rotating bits that are constantly clipped by the shadow volume resulting in shadows flickering all over the place.
In short: What we want is a shadow volume that is as tight as possible around the aircraft for shadow quality, but not too tight because that also leads to problems.
What’s new in 11.10
In 11.10 the algorithm to compute the shadow volume has been completely changed. Instead of trying to jiggle around with the physical volume and the volume of all OBJs together and then coming up with a sane value, X-Plane now looks at what is actually being rendered. We start out with the physical bounding volume as before, but then we look at what is actually rendered! For that, we go through every OBJ that is marked as casting shadows and run the OBJ engine as if we were to render the whole thing. So OBJ animations as well as kill datarefs etc are considered. This happens during the first frame, so everything is set up the way it would be during normal rendering. Everything that is visible will be marked as such and the shadow volume will be expanded to include this OBJ.
The result is a volume with a tight fit around what is actually visible and therefore considered “aircraft”. Everything else is not included in the shadow volume and therefore stops casting shadows altogether. Of course, this is only in aircraft only shadow mode and is not used when scenery shadows are on. In that case, everything is handled like it was before and everything that is supposed to cast shadows does cast shadows. So, if you see missing shadows in aircraft only shadow mode, this is probably due to this change.
To visualize the differences, here are 4 screenshots showing the quality difference as well as the new shadow volume:
11.10
11.05
11.10
11.05
One thing that should be noted though is that going forwards these kinds of extra OBJs should really be done via the new drawing API in the 3.0 SDK! This allows us to very accurately determine the size of the aircraft but it also means that culling will become more accurate. The old method will of course continue to work, but it’s not the best or most efficient way to approach ground vehicles and other ground clutter.
Aircraft icons
The calculated volume for the whole aircraft with attached OBJs was also used for the aircraft icon generation. This led to some weird cases where the camera was positioned in such way that the aircraft was incredibly tiny due to the fact that we tried to get “everything” in at once. So far the recommendation was for authors to create a version of their aircraft without all the extra OBJs attached, but now that we have an adequate measure of the aircraft volume this is fixed as well! Aircraft icons should be correctly generated now with the camera positioned to capture the plane at the right distance.
There is one more fix for aircraft icons: Some authors created aircraft that did some clever culling based on where the pilots head is and then using the kill dataref to prevent parts of the aircraft from being rendered. Reading the view dataref now correctly reports the camera as being an external camera so that those custom culling solutions work with the aircraft icon generator. If your aircraft still doesn’t generate proper icons after 11.10, please file a bug report and let us know!
AI aircraft are often way more resource-intensive than they need to be. Users are fine paying a performance penalty to load, say, a super detailed 3-D cockpit model for their own aircraft, but for AI planes, where you’re never going to be in the cockpit, there’s no reason for that sort of thing. A significantly “dumbed down” version of the same aircraft would allow users to load more AI planes at once, with no visible downsides during normal use.
Many aircraft, for one reason or another, simply won’t function at all when used as AI planes. This is most commonly due to one of two issues:
reliance on third-party plugins (which only work for the user’s plane)
lack of support from X-Plane for flying aircraft like this (for instance, the X-Plane AI doesn’t know how to fly gliders, seaplanes, or rockets)
As a user, this is really frustrating, because it’s difficult or impossible to know in advance which aircraft will work as AI planes and which will either a) just sit on the runway, never able to take off, and/or b) tank your frame rate.
Coming in X-Plane 11.10: AI-Only and User-Only Aircraft
In the upcoming X-Plane 11.10 beta, we’ve added two new options to Plane Maker’s Author window: “supports user flight” and “supports AI flight.” By default, all aircraft support user flight, and do not support use as AI aircraft.
If a plane is configured for AI flight only, it will never be shown in the normal aircraft grid—only in the AI aircraft window.
If a plane is configured for user-flight only (or if it’s a pre–11.10 aircraft with no “supported flight type” info), it will be hidden in the AI aircraft window by default, but for the sake of backward compatibility with old planes, users will still be able to reveal them by checking a box labeled “Show aircraft without AI support.”
The upshot for aircraft authors
In the Glorious Future, we envision third parties shipping two versions of their aircraft:
one marked user only, which include all the bells and whistles, plugin-enhancements, and as much detail as possible
one marked AI only, which is stripped down for performance, only using plugin enhancements that have been tested in AI configurations.
The result will be a faster, more consistent, less error prone experience for users.
These smaller features are likely to be overshadowed by the release of the G1000 for default aircraft in 11.10, so I decided to dedicate a blog post to promote the articles I’ve written – you can find them among all the guides for aircraft developers: http://developer.x-plane.com/docs/aircraft/
Electric and remote gyro systems
Back in April, I flew a Mooney M20J with a KCS55A HSI in it, and realised that it was impossible to model in X-Plane correctly, so I got to work. See the manual for an explanation of this popular HSI/remote gyro system.
I’ve written a usage guide on the new datarefs and commands that I added, along with some more detailed explanation of all the different gyro systems X-Plane simulates, in this guide for aircraft developers. I also talked about the systems at length in a Youtube live stream earlier this year.
Separate GPSS autopilot mode
This is a feature that many add-on aircraft already simulate to some degree, but by means of more or less reliable plugin trickery. The X-Plane 11 default 737 and 747 are no exception. With X-Plane 11.10, a separate GPS steering mode for the autopilot becomes a standard feature.
The new datarefs and commands are explained in detail here.
Screen-only popup instrument windows
Several people who build home-cockpit setups have asked about removing the bezels from the popup displays, so they can have only the screen of a GNS430/530, FMS or G1000 instrument to put on an external monitor, with a hardware bezel around it. While this can already be achieved through some clever hacking in the Miscellaneous.prf file, we now offer a more straightforward way to do this: The popup and pop-out windows now get their bezel graphics from the library system, so you can override the bezel graphics. How to override the bezel with nothing, if your bezel is made of hardware? Simply supply a 1×1 pixel blank .png as a bezel graphic, and X-Plane will know that you really want no bezel at all. In the case of a bezel-less 430, you’d put a 1×1 pixel png as the “cockpit/radios/GPS FMS/Garmin_430_2d.png” resource of your plane.
If you have been doing work with manipulators during beta.1, please download this new one and review the notes! Download the latest here: io_xplane2blender_3_4_0_b3.zip
Fixes
#ATTR_layer_group_draped causing KeyErrors
Reverts bad change to manipulators properties*
Adds
“.beta.3” will be printed on all OBJs. This is not permanent, expect something better in the future
What happened to the manipulators?
A poor decision to change the Manipulator Type (Drag XY, Push, Command Knob, Toggle, Delta, etc) means that if you changed the type of manipulator between beta.1 (or 7fe534ad1f906b7853827 if you constantly check out the latest cutting edge commits [which I do not recommend for this exact reason]), this beta will make those changes irrelevant.
Example, suppose on 8/1/2017 you create a switch and set the manipulator type to Toggle, then with beta.1 you change the type to Push. Beta.3 will show the type as Toggle. All you need to do is go back to the switch and change the type back to Push. The rest of the values you set will still be there. If you created manipulators during the beta, they will be set back to the default “Drag XY” type and will need to be fixed.
This is an unfortunate lesson to be learned, and if you are facing a lot of tediousness (30 manipulators to hunt down and change) or potential errors (you can’t remember how many or which ones you changed) please contact me!
I will personally help you recover the changes you made during beta.1 – present.


XPlane2Blender v3.4.0-rc.1
We made it people!
Change log
This release encompasses all of the beta. You can read through the beta notes for more details, but, here are the highlights:
New Features
Important bugs
We could not have gotten this far without the incredible support of our beta testers, new authors, bug reporters, and all the wonderful artists who give us the inspiration and energy to make this product better! It has been an incredible journey diving into this facet of the community and I look forward to even more releases, including VR manipulators, full WYSIWYG lights, and more!
Thank you!